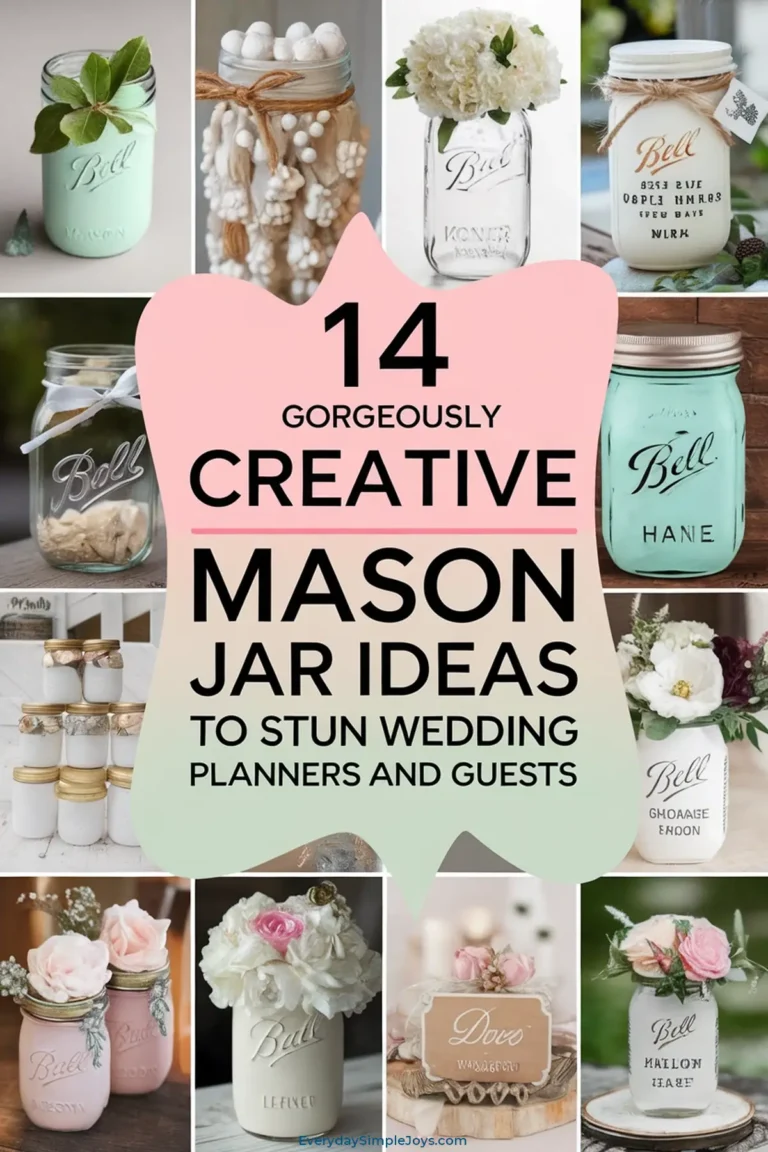
Too much work to do to plan even the simplest of weddings? Not enough time to think about something different?
Well, believe it or not, you can still make something easy that is absolutely stunning and inexpensive compared to florist-bought wedding table centerpieces. Mason jars work so perfect for this type of decor and either you or a friend or family member can get the job done rather quickly.
In fact, you might consider accepting this task as a gift from someone special to make the memories even more meaningful.
What I’ve done is thought about 14 different mason jar ideas for wedding table centerpieces that I think would look both elegant and expensive!
1. Sheet Music Mason Jar with Black Bow
This elegant mason jar serves as a stunning decorative accent for a music lover’s home, perfect as a shelf centerpiece, a desk organizer for pens and small items, or a unique vase for dried flowers. It’s also an ideal personalized gift for musicians, teachers, or anyone who cherishes melody and craftsmanship. For a wedding, these jars could line reception tables, glowing with battery-operated fairy lights that highlight the sheet music of the couple’s first-dance song.
Materials List
- Mason Jar: Standard pint-sized (16 oz) glass mason jar with lid (wide-mouth preferred for easier assembly).
- Sheet Music: Several pages of printed or photocopied sheet music, choose favorite songs, vintage pieces, or decorative printable sheets from craft stores (roughly 2-3 pages, depending on jar size).
- Mod Podge: Matte or glossy finish, about 4 oz, for gluing and sealing the sheet music.
- Foam Brush: 1-inch wide for smooth application of Mod Podge.
- Scissors: Sharp, for trimming sheet music to size.
- Black Ribbon: 1-1.5 inches wide, satin or grosgrain, approximately 18-24 inches long to tie around the neck.
- Optional Embellishments: Small faux flowers, a charm, or a tag to attach to the bow for extra flair.
- Ruler or Measuring Tape: To measure and cut the sheet music accurately.
- Pencil: For light marking during prep (optional).
Transform a humble mason jar into a symphony of style with this sheet music and black bow creation, a blend of vintage charm and modern chic that sings with personality. Begin by selecting your sheet music. Opt for songs that hold sentimental value (like a first dance tune or a childhood lullaby), or simply grab decorative sheets from a craft store for a cohesive look. If you’re printing your own, use standard 8.5×11-inch paper and aim for a slightly aged, sepia-toned effect with your printer settings for extra character.
Wipe out the inside and front of your mason jar with a cloth to remove any dust. Measure the height and circumference of your jar (a pint jar is typically about 5 inches tall and 10 inches around). Cut your sheet music into strips or panels to fit. For a seamless look, trim one long strip to wrap fully around, or use overlapping vertical panels for a layered effect. If the music has lyrics or notes you want to highlight, plan their placement now, perhaps centering a beloved refrain where it’s most visible.
Using your foam brush, apply a thin, even layer of Mod Podge to the inside of the jar where the first piece of sheet music will go. Press the paper gently against the glass, smoothing it from the center outward to avoid bubbles or wrinkles. Work quickly, as Mod Podge dries fast. If you’re wrapping one continuous strip, keep unrolling and gluing as you circle the jar. For panels, apply each piece with slight overlaps (about 1/8 inch) for a tidy finish. Once the entire interior is lined, let it dry for 20-30 minutes until the adhesive sets.
Next, seal the deal. Brush another light coat of Mod Podge over the inner surface of the sheet music. This protects it from moisture or wear and gives it a polished sheen (matte keeps it subtle, glossy adds a pop). Don’t overdo it, as too much can make the paper soggy. Let it cure fully for at least an hour, or overnight for best results, ensuring the jar is stable and upright.
Now, the pièce de résistance: the black bow. Take your ribbon and wrap it around the jar’s neck, just below the threading where the lid screws on. Tie it into a classic bow, aiming for loops about 3-4 inches long and tails that dangle gracefully. For a pro touch, angle-cut the ribbon ends to prevent fraying. If you’re feeling fancy, hot-glue a tiny faux flower, a musical note charm, or a handwritten tag (think “To: Mom, Love: Your Maestro”) to the knot.
The result? A mason jar that’s both a visual and emotional masterpiece, ready to hold memories as well as trinkets. Pop in some pens, faux greenery, or even fairy lights for a soft glow that dances through the notes. It’s a craft that’s as simple as it is sophisticated, music to your eyes and soul.
2. Spring Rabbit Mason Jar
This charming mason jar brings a burst of springtime whimsy to any space, ideal for holding treats like jelly beans or small Easter eggs, or even as a quirky planter for tiny succulents. It’s a delightful gift for kids, gardeners, or anyone who loves a touch of playful elegance. For a wedding, these jars could dot the dessert table, filled with pastel candies that peek through the rabbit silhouette, tying into a spring-themed celebration.
Materials List
- Mason Jar: Standard pint-sized (16 oz) glass mason jar with lid (regular or wide-mouth works).
- Acrylic Paint: One spring color (e.g., soft mint green, pale pink, or buttery yellow), about 2-4 oz, suitable for glass.
- Rabbit Stencil: A pre-cut stencil of a rabbit (sitting up or lying down), sized to fit the jar (about 3-4 inches tall), available at craft stores or printable online.
- Painter’s Tape: Low-tack, to secure the stencil, about 1-inch wide.
- Sponge Brush: Small, for even paint application (1-2 inches wide).
- Jelly Beans or Easter Eggs: A mix of colorful jelly beans (8-12 oz) or small plastic Easter eggs (6-10 pieces) to fill the jar.
- Paper Towels: For cleanup and stencil dabbing.
- Rubbing Alcohol: A small amount (1-2 oz) and a cloth to prep the glass.
- Clear Sealer (Optional): Spray-on acrylic sealer, matte or gloss, to protect the paint.
Hop into spring with this adorable rabbit mason jar, a craft that blends seasonal cheer with a peekaboo twist. Start by choosing your spring hue. Think soft pastels like mint green, pale pink, or a sunny yellow, colors that scream renewal and pair beautifully with the rabbit motif. Acrylic paint made for glass ensures durability, so grab a small bottle from the craft aisle. Wipe out the inside and front of your mason jar with a cloth to remove any dust.
Next, prep your rabbit stencil. You can buy one (look for a 3-4-inch design at a craft store), or print and cut your own from cardstock using an online template. Decide if your bunny’s sitting up, ears perked, or lying down, relaxed and ready for Easter. Secure the stencil to the jar’s front with painter’s tape, pressing the edges firmly to prevent paint bleed. If it’s a sticky stencil, peel and stick carefully, smoothing it flat against the glass.
Grab your sponge brush and pour a little paint onto a paper plate. Dab the brush into the paint, then lightly tap off excess onto a paper towel. You want a dry-brush effect to avoid drips. Gently sponge the paint over the stencil, covering the jar’s exterior except where the rabbit sits. Work in thin layers, building up color evenly. Two or three coats should do it, letting each dry for 15-20 minutes (check your paint’s label). Once satisfied, peel off the stencil while the paint’s still slightly tacky for crisp lines. Let the jar cure fully, about an hour, or overnight if you’re adding a sealer.
If you want extra protection (say, for outdoor use), spritz the outside with a clear acrylic sealer once the paint’s dry. Hold the can 8-10 inches away and mist lightly, avoiding the clear rabbit window. Let it set for another hour. Now, fill ‘er up! Pour in a rainbow of jelly beans or tuck in small Easter eggs, letting their colors pop through the unpainted rabbit shape. Screw on the lid, or leave it off for easy access if it’s a display piece.
The finished jar is a springtime stunner, with its cheerful paint and transparent bunny revealing a sweet surprise inside. It’s perfect for gifting or brightening your own space, a little nod to the season’s playful spirit.
3. Ombre Glitter Mason Jar
This dazzling mason jar radiates springtime sparkle, perfect as a standalone decor piece on a mantel, a mini time capsule for tiny treasures, or a chic storage spot for colorful craft supplies like beads or buttons. It’s a fabulous gift for crafters, teens, or anyone who loves a splash of glamour. For a wedding, these jars could adorn guest tables, their gradient shimmer catching the light as chic, budget-friendly centerpieces.
Materials List
- Mason Jar: Standard pint-sized (16 oz) glass mason jar with lid (wide-mouth for easier handling).
- Glitter: Three colors in fine grain (e.g., blue, pink, purple), about 1-2 oz each for a smooth ombre effect.
- Mod Podge: Gloss finish, about 4 oz, to adhere and seal the glitter.
- Foam Brush: 1-inch wide for applying Mod Podge evenly.
- Mixing Cups: Three small disposable cups or bowls to blend glitter and Mod Podge.
- Spoon or Stir Stick: For mixing (plastic or wooden, one per color).
- Painter’s Tape: 1-inch wide, to section off the jar for clean transitions.
- Paper Plates or Newspaper: To catch excess glitter and protect your workspace.
- Rubbing Alcohol: A small amount (1-2 oz) and a cloth to clean the jar.
- Clear Sealer (Optional): Spray-on acrylic sealer, gloss, to lock in the sparkle.
Turn a plain mason jar into a mesmerizing ombre glitter masterpiece, a craft that layers color and shine for a stunning spring vibe. Start by picking your glitter trio. Blue, pink, and purple make a dreamy palette, fading from deep to soft like a sunset. Fine-grain glitter ensures a sleek finish, so snag small jars from the craft store. Wipe out the inside and front of your mason jar with a cloth to remove any dust.
Divide your jar visually into three horizontal sections: bottom, middle, and top. Use painter’s tape to mark off the top two-thirds for now, leaving the bottom exposed. In a mixing cup, blend about 1-2 tablespoons of Mod Podge with your first color (say, blue). Stir in enough glitter until it’s thick but spreadable, like sparkly frosting. With your foam brush, apply this mix to the bottom third, spreading it evenly from the base up to the tape line. Don’t skimp, but avoid globs. Sprinkle extra dry glitter over the wet layer for max sparkle, then tap off excess onto a paper plate. Let it dry for 20-30 minutes.
Peel off the tape, move it down to cover the bottom section, and expose the middle third. Mix your second color (pink, perhaps) with Mod Podge in a new cup, aiming for a slightly lighter shade by tweaking the glitter ratio. Brush it on, overlapping the blue just a tad for a smooth fade. Add more dry glitter, tap off excess, and let it set. Repeat for the top third with purple, taping off the middle, blending upward, and finishing with a glitter dusting. Once all layers are dry (about an hour total), check your gradient. If transitions need softening, dab a bit of mixed Mod Podge at the seams.
For durability, especially if it’ll face wear, mist the outside with a gloss sealer once everything’s cured (wait an hour after the last layer). Hold the can 8-10 inches away, spray lightly, and let it dry overnight. The result is a jar that glows with a seamless shimmer, shifting from bold to delicate. Leave it empty to shine on its own, or toss in some beads or tiny keepsakes if you’re feeling crafty. It’s a little dazzler that brings spring sparkle wherever it lands.
4. Wallpaper-Lined Mason Jar with Bow
I love how a bit of wallpaper inside a jar can turn it into something special. It’s perfect for keeping a handful of colored pencils or some spare change handy, great for anyone who’s into crafts and likes a little style on their desk.
Materials List
- Mason Jar: Standard pint-sized (16 oz) glass mason jar with lid (wide-mouth for easier lining).
- Wallpaper or Shelf Liner: Leftover scraps or a single sheet (at least 10×5 inches), in a spring pattern like damask, toile, or soft chevrons.
- Mod Podge: Matte finish, about 4 oz, for gluing and sealing the paper.
- Foam Brush: 1-inch wide for applying Mod Podge smoothly.
- Scissors: Sharp, for cutting the wallpaper to size.
- Ribbon: 1-1.5 inches wide, in a coordinating color (e.g., lavender, ivory, or pale gold), about 18-24 inches long.
- Ruler or Measuring Tape: To measure the jar and paper accurately.
- Pencil: For light marking on the paper (optional).
- Rubbing Alcohol: A small amount (1-2 oz) and a cloth to clean the jar.
Craft a mason jar that’s all about understated elegance with this wallpaper-lined design, tied off with a bow for a hint of grace. Start by choosing your paper. Hunt down a spring-inspired scrap of wallpaper or shelf liner, something like a delicate damask, classic toile, or gentle chevrons. You’ll need a piece to cover the jar’s interior, about 10 inches wide by 5 inches tall for a pint size. Wipe out the inside and front of your jar with a cloth to remove any dust.
Measure the jar’s inner height and circumference (roughly 5 inches tall, 10 inches around). On your paper, sketch a rectangle to match, adding a 1/4-inch overlap on the width. Cut it out with sharp scissors for clean edges. Roll it into a loose tube and slip it inside the jar to check the fit, it should sit flush against the glass. Take it out, then use your foam brush to coat the paper’s back (the side that’ll face the glass) with a thin layer of Mod Podge. Slide it back in, pressing it gently against the walls, smoothing from the center to the edges to avoid bubbles. Align the overlap for a tidy seam.
Brush a light coat of Mod Podge over the paper’s inner surface to seal it, keeping it secure and smooth. Don’t overdo it, excess can wrinkle the paper. Let it dry for 30-60 minutes, standing upright. Pick a ribbon that complements your pattern, maybe lavender for toile or ivory for damask. Wrap it around the jar’s neck, just below the threads, and tie a bow with 3-4 inch loops and soft tails. Trim the ends at an angle for a neat finish.
The finished jar is a quiet stunner, its lining a backdrop that elevates whatever it holds. Drop in a handful of colored pencils for a crafty vibe, or pour in some spare change for a casual desk buddy. It’s a simple project that turns a jar into something with real personality, ideal for adding a touch of spring to any workspace.
5. Golden Heart Candy Jar
A gold jar with a heart window showing red candies is all about love. It’s a wedding must-have, turning tables into a sweet tribute to the couple that guests won’t forget.
Materials List
- Mason Jar: Standard pint-sized (16 oz) glass mason jar with lid (regular mouth works).
- Acrylic Paint: Gold, about 2-4 oz, formulated for glass surfaces.
- Heart Stencil: A large heart, 4-5 inches tall, to fit the jar’s front (store-bought or hand-cut).
- Painter’s Tape: 1-inch wide, to secure the stencil.
- Sponge Brush: Small, 1-2 inches wide, for painting.
- Red Candy Hearts: 8-12 oz of small red candy hearts (like cinnamon hearts or conversation hearts).
- Burgundy Ribbon: 1-1.5 inches wide, about 18-24 inches long, for the neck.
- Rubbing Alcohol: A small amount (1-2 oz) and a cloth to clean the jar.
- Paper Towels: For cleanup and paint dabbing.
- Clear Sealer (Optional): Spray-on acrylic sealer, gloss, to protect the paint.
Craft a mason jar that’s pure gold and heart with this love-inspired design, where a stenciled window reveals a stash of red candy hearts. Start with your jar, wipe out the inside and front with a cloth to remove any dust. Grab your gold acrylic paint, the kind made for glass so it sticks and shines. Pick a large heart stencil, 4-5 inches tall, big enough to dominate the jar’s front and let those candies peek through. Tape it on with painter’s tape, pressing the edges down tight to keep paint from sneaking under.
Pour some gold paint onto a paper plate, dip your sponge brush lightly, and dab off excess on a paper towel. You want it nearly dry to avoid runs. Sponge the paint over the jar’s exterior, covering everything but the heart shape. Work in thin layers, two or three coats, letting each dry 15-20 minutes (check the paint bottle). The gold builds up rich and even, leaving the heart clear as a window. Peel off the stencil while the last coat’s tacky for sharp edges, then let the jar cure for an hour.
For extra durability, spray a light gloss sealer over the gold once it’s dry. Hold the can 8-10 inches away, mist gently, and let it set overnight. Fill the jar with red candy hearts, cinnamon ones for a kick or conversation hearts for fun. The red pops through the heart, a sweet surprise against the gold. Take your burgundy ribbon, wrap it around the jar’s neck just below the threads, and tie a bow with 3-4 inch loops and trailing ends. Snip the tails at an angle for a sharp look.
The finished jar is a golden beauty, its heart window framing the candies like a love note in plain sight. Set it out on wedding tables, it’s a simple yet striking way to share the couple’s sweetness with every guest.
6. Clothespin Bird Perch Jar
A little clothespin bird, red like a cardinal, blue like a blue jay, or yellow like a finch, glued to a jar lid is too cute to ignore. It’s a fun way to hold some crayons for kids, perfect for that little artist who’s always coloring.
Materials List
- Mason Jar: Standard pint-sized (16 oz) glass mason jar with lid (regular mouth is fine).
- Wooden Clothespin: One standard-sized clothespin (about 3 inches long) for the bird body.
- Acrylic Paint: Red, blue, or yellow, about 1-2 oz, for the bird (plus black/white for details).
- Paintbrush: Small, fine-tipped, for painting the bird.
- Hot Glue Gun: With glue sticks, to attach the bird to the lid.
- Ribbon: 1-1.5 inches wide, in a nice color (e.g., green, white, or coral), about 18-24 inches long.
- Craft Foam or Felt: Small scraps (1×1 inch) in a matching color for wings/beak.
- Scissors: Sharp, for cutting foam or felt.
- Rubbing Alcohol: A small amount (1-2 oz) and a cloth to clean the lid.
Turn a mason jar into a springtime charmer with this clothespin bird perched atop, complete with a ribbon and a little something inside. Take a clothespin for the bird’s body. Paint it red like a cardinal, blue like a blue jay, or yellow like a finch with acrylic paint, brushing it on evenly with a fine brush. Let it dry for 20-30 minutes. Add a black dot for an eye, a white speck for a highlight, and maybe a beak outline. Cut a 1/2-inch triangle from craft foam or felt for the beak, and two 1-inch teardrop shapes for wings, matching or contrasting the body color. Hot-glue the beak to the clip end, wings to the sides, holding each for 10 seconds to stick.
Wipe out the inside and front of your mason jar with a cloth to remove any dust. Clean the lid with rubbing alcohol and a cloth too. Once dry, heat your glue gun. Put a small line of glue on the lid’s center, then press the bird’s flat base (non-clip side) onto it, holding for 20-30 seconds until secure. Let it cool for 5 minutes, it’ll sit firm.
Pick a ribbon, green for a fresh look, white for simplicity, or coral for warmth. Wrap it around the jar’s neck, just below the threads, and tie a bow with 3-4 inch loops and tails. Trim the ends at an angle. Drop in a handful of crayons, the short kind kids love, and watch them peek out under that bird’s watchful eye.
The jar’s a small, useful piece with a handmade quirk, perfect for a kid’s art corner or a playful gift. That little bird adds just the right touch of fun to a simple craft.
7. Frosted Mason Jar Luminary
A frosted jar that glows with a tealight inside is pure cozy magic. It’s an easy way to light up a porch or bedroom, perfect for anyone who loves a warm vibe at night.
Materials List
- Mason Jar: Standard pint-sized (16 oz) glass mason jar (no lid needed).
- Frosting Spray Paint: One can (about 6-8 oz), like Krylon Frosted Glass Finish, for that misty look.
- Painter’s Tape: 1-inch wide, to mask off areas if desired.
- Paper Towels: For cleanup and overspray protection.
- Tealight Candle: One standard tealight (real or LED).
- Rubbing Alcohol: A small amount (1-2 oz) and a cloth to prep the jar.
- Newspaper or Drop Cloth: To cover your workspace.
Create a frosted mason jar luminary that turns any night into a cozy escape, with a soft glow that’s pure springtime charm. Grab a can of frosting spray paint, something like Krylon’s Frosted Glass Finish for that perfect misty effect. Wipe out the inside and front of your mason jar with a cloth to remove any dust. If you want a clean edge or a pattern, use painter’s tape to mask off the top rim or make stripes, but a full frost works just as well.
Set up your workspace with newspaper or a drop cloth, somewhere with good ventilation. Shake the spray can for a minute, then hold it 8-10 inches from the jar. Start with a light, even coat, sweeping side to side over the outside. Don’t go heavy, you want that translucent look, not a solid blob. Let it dry for 10-15 minutes, then add another coat if it’s too sheer. Two or three light layers should give you that frosted glow, check after each one dries. Peel off any tape while it’s tacky for sharp lines, then let the whole thing cure for an hour.
Once it’s set, drop a tealight inside, a real one for that warm flicker or an LED if you’re keeping it simple. The frost scatters the light like a soft fog, making it a perfect little lantern. Set it on your porch for a twilight vibe or in your bedroom for a late-night unwind.
The finished jar is a breeze to make and looks way fancier than it is, with that frosted sheen turning a plain tealight into something special. It’s a quick craft that brings a warm, inviting feel anywhere you put it.
8. Triple Jar Floral Centerpiece
Make a splash with this beautiful centerpiece that contains two clear jars lightly tinted and one painted solid, all nestled in a wooden tray and packed with roses and peonies. It’s a jaw-dropper for your table, perfect for someone who loves a bold look.
Materials List
- Mason Jars: Three standard pint-sized (16 oz) glass mason jars (no lids needed).
- Acrylic Paint: One light color (e.g., pale blue or blush) for tinting two jars, about 2-4 oz, and one bold color (e.g., deep green or navy) for the solid jar, about 2-4 oz, both suitable for glass.
- Sponge Brush: Small, 1-2 inches wide, for painting.
- Wooden Tray: Rectangular, about 12-15 inches long, 4-6 inches wide, in brown or natural finish.
- Flowers: Fresh roses, peonies, and filler blooms (e.g., baby’s breath), enough to fill three jars generously.
- Rubbing Alcohol: A small amount (1-2 oz) and a cloth to prep the jars.
- Paper Towels: For cleanup and paint dabbing.
- Clear Sealer (Optional): Spray-on acrylic sealer, gloss, to protect the paint.
Build a triple jar floral centerpiece that’s all about big, beautiful impact, with two lightly tinted jars flanking a solid-painted one, all overflowing with flowers. Start with your three jars. Wipe out the inside and front of each with a cloth to remove any dust. Pick a light color for two of them, like pale blue or blush, and a bold one for the middle, maybe deep green or navy. Use acrylic paint made for glass so it sticks.
For the tinted jars, pour a little light paint onto a paper plate, mix in a few drops of water to thin it, and dab your sponge brush in. Wipe it lightly over the outside, aiming for a sheer wash, not full coverage. One or two passes should do, letting each dry 15-20 minutes, until it’s just a hint of color. For the middle jar, use the bold paint straight up. Sponge it on thick, two or three coats, drying 15-20 minutes between, until it’s solid and rich. Let all three cure for an hour. If they’ll be handled, spray a gloss sealer over the paint, holding the can 8-10 inches away, and let it dry overnight.
Grab your wooden tray, a brown or natural one that’s long enough to hold all three jars snugly. Line them up, tinted ones on the ends, bold one in the center. Fill each to the brim with fresh roses and peonies, mixing in some filler like baby’s breath for volume. Cut the stems short so the blooms burst out the top, not too fussy, just full and lush.
The finished centerpiece is a stunner, with that mix of soft tint and deep color setting off the flowers like a pro arrangement. It’s perfect for a dining table or anywhere you want to make a statement, a craft that looks extravagant but comes together fast.
9. Fairy Light Wildflower Jar
Imagine fairy lights and sweet wildflowers mixed in a jar, like fireflies caught in a meadow. It’s a magical glow for your porch or a wedding table, perfect for someone who loves that enchanted feel.
Materials List
- Mason Jar: Standard pint-sized (16 oz) glass mason jar (no lid needed).
- Fairy Lights: Battery-operated string, about 6-10 feet with 20-30 small LEDs.
- Wildflowers: Fresh or faux, a small bunch (e.g., daisies, clover, or baby’s breath).
- Rubbing Alcohol: A small amount (1-2 oz) and a cloth to prep the jar.
Create a fairy light wildflower jar that captures the glow of a meadow night, a simple craft with a big wow factor. Wipe out the inside and front of your mason jar with a cloth to remove any dust. Grab a string of battery-operated fairy lights, the tiny LED kind, about 6-10 feet long. Test them first to make sure they work, then loosely coil them into the jar, leaving the battery pack out so you can tuck it behind later.
Pick your wildflowers, fresh ones like daisies or clover if you’ve got them, or faux if you want it to last. Trim the stems short, about 4-5 inches, so they fit inside without crowding. Start weaving them into the lights, tucking stems between the coils so the blooms poke out randomly. Don’t overthink it, the messier the better, like they grew there naturally. Keep going until the jar feels full but not stuffed, you want the lights to shine through.
Turn on the lights and adjust the flowers a bit if any spots look dark. The battery pack can sit outside the jar, hidden on a table or porch ledge. The finished jar glows like fireflies caught mid-dance, with wildflowers adding that sweet, untamed touch.
It’s a quick project that feels like pure magic, perfect for a wedding table or a porch corner. One jar’s enough to charm, but a few together could light up a whole night.
10. Painted Flower Bath Salt Jar
I can’t get over how cool it is to take short jars, paint them with gorgeous flowers, and stuff them with bath salts for wedding favors. It’s such a fun, thoughtful way to send guests home with a little piece of relaxation, and it’s absolutely perfect for a couple who wants their day to stand out with something unique and handmade.
Materials List
- Mason Jar: Short half-pint (8 oz) glass mason jar with lid.
- Acrylic Paint: Multiple colors for flowers (e.g., pink, yellow, green), about 1-2 oz each, suitable for glass.
- Paintbrush: Small, fine-tipped, for detailed flower painting.
- Bath Salts: About 6-8 oz per jar, plain or scented (e.g., lavender or rose).
- Rubbing Alcohol: A small amount (1-2 oz) and a cloth to prep the jar.
- Paper Towels: For cleanup and paint dabbing.
- Clear Sealer (Optional): Spray-on acrylic sealer, gloss, to protect the paint.
Make a painted flower bath salt jar that’s a wedding favor with heart, turning short jars into little works of art. Wipe out the inside and front of your mason jar with a cloth to remove any dust. Grab some acrylic paint in flower colors, think pink for petals, yellow for centers, green for leaves. A fine-tipped brush is your best friend here. Sketch a simple flower design in pencil on the outside if you’re nervous, or just freehand it—daisies, roses, whatever you can manage.
Start painting the flowers on the jar’s exterior. Dip your brush in one color at a time, wiping off excess on a paper towel. Layer petals first, maybe five or six in a circle for a daisy, then add a dot of yellow in the middle. Throw in a few green leaves or stems. Keep it loose, not perfect, it’s the handmade vibe that sells it. Let each color dry 10-15 minutes before switching, so they don’t smear. Cover as much of the jar as you want, one big flower or a scatter of small ones. Let it cure for an hour.
Spray a light gloss sealer over the paint if you’re worried about scratches, holding the can 8-10 inches away, and let it dry overnight. Fill the jar with bath salts, about 6-8 oz, plain or scented with something like lavender. Screw on the lid tight.
The finished jar is a sweet little gift, with those painted flowers making the bath salts feel extra special. Hand these out at a wedding, and guests will love the personal touch—a relaxing treat that’s as pretty as it is useful.
11. Lace-Wrapped Potted Plant Jar
I love the idea of wrapping jars in lace or something pretty and tucking a tiny potted plant inside. It’s finished off with care instructions and the bride and groom’s names and wedding date. What an adorable, living wedding favor that guests will love taking home, perfect for a couple who wants to share a bit of green magic from their big day.
Materials List
- Mason Jar: Standard pint-sized (16 oz) glass mason jar (no lid needed).
- Lace or Fabric: About 12×6 inches of lace or pretty material (e.g., burlap, floral cotton).
- Hot Glue Gun: With glue sticks, to attach the lace.
- Small Potted Plant: A tiny plant (e.g., succulent or herb) in a 2-3 inch pot.
- Paper Tag: Small cardstock (2×3 inches) for care instructions and names/date.
- Pen: For writing on the tag.
- Rubbing Alcohol: A small amount (1-2 oz) and a cloth to prep the jar.
Wrap a mason jar in lace and turn it into a living wedding favor with a tiny plant inside, a craft that’s as cute as it is clever. Wipe out the inside and front of your jar with a cloth to remove any dust. Pick your wrapping, lace for that delicate look, or maybe burlap or a floral cotton scrap for something different. Cut it to about 12 inches wide by 6 inches tall, enough to go around the jar with a little overlap.
Heat up your glue gun. Run a thin line of glue along one edge of the fabric, press it to the jar near the bottom, and hold for 10 seconds. Wrap it around, keeping it snug, and glue the overlap in place. If you want, add a dot of glue at the top edge too, but don’t cover the threads. Trim any excess with scissors for a clean finish. Let it cool for 5-10 minutes.
Grab a small potted plant, like a succulent or herb, in a 2-3 inch pot that fits inside the jar. Drop it in so the pot sits at the bottom, the plant peeking out the top. Write up a little tag on cardstock—care instructions like “water weekly, full sun,” plus the bride and groom’s names and wedding date. Punch a hole in it and tie it to the lace with a bit of string, or just tuck it in with the plant.
The finished jar is a green gem, that lace adding a soft touch to the living plant inside. It’s a wedding favor that grows with you, a sweet way to remember the day.
12. Animal Lid Candy Jar
How fun is it to stick plastic animals on jar lids, paint them bright, and load the jar with jelly beans or candies? It’s a quirky, eye-catching treat holder for your kitchen, perfect for anyone who loves a little whimsy with their snacks.
Materials List
- Mason Jar: Standard pint-sized (16 oz) glass mason jar with lid.
- Plastic Animals: Small toy animals (e.g., elephant, dinosaur), about 2-3 inches tall.
- Acrylic Paint: Bright colors (e.g., red, teal, orange), about 1-2 oz each, non-toxic.
- Paintbrush: Small, for painting the animals.
- Hot Glue Gun: With non-toxic glue sticks, to attach animals.
- Jelly Beans or Candies: 8-12 oz to fill the jar.
- Rubbing Alcohol: A small amount (1-2 oz) and a cloth to prep the lid.
Make an animal lid candy jar that’s all about fun, with a painted critter guarding your sweets. Pick a small plastic animal—an elephant, dinosaur, whatever’s got character, about 2-3 inches tall. Wipe out the inside and front of your mason jar with a cloth to remove any dust, and do the same to the lid with rubbing alcohol. Heat your glue gun with non-toxic glue, dab a blob on the lid’s center, and press the animal’s base down, holding for 20-30 seconds until it sticks. Let it cool for 5 minutes.
Grab some non-toxic acrylic paint in bright colors, like red, teal, or orange. Brush it on the animal, covering it fully or adding spots and stripes if you’re artsy. Let it dry 20-30 minutes, then add a second coat if it’s patchy. Keep it simple or go wild, it’s your zoo. Let it cure for an hour so the paint sets.
Fill the jar with jelly beans or candies, about 8-12 oz, a mix of colors looks best. Screw the lid on tight, that animal perched like it’s ready to pounce. The finished jar is a playful treat holder, with that bright critter making it a kitchen standout.
It’s a quick craft that’s big on charm, perfect for a counter or a kid’s room. The candies inside are just the bonus to this little handmade star.
13. Leafy Tealight Jar
I can’t get enough of gluing fake leaves around a jar and dropping a tealight inside for that fall glow. It’s a cozy, rustic touch for your table or porch, perfect for someone who lives for those crisp, sweater-weather nights.
Materials List
- Mason Jar: Standard pint-sized (16 oz) glass mason jar (no lid needed).
- Fake Leaves: Assorted artificial leaves (e.g., maple, oak), about 10-15 small ones in fall colors.
- Mod Podge: Matte finish, about 4 oz, for gluing leaves.
- Foam Brush: 1-inch wide for applying Mod Podge.
- Tealight Candle: One standard tealight (real or LED).
- Sand: About 1-2 cups, for the base inside.
- Rubbing Alcohol: A small amount (1-2 oz) and a cloth to prep the jar.
Craft a leafy tealight jar that brings fall right to your table, with fake leaves and a warm glow. Wipe out the inside and front of your mason jar with a cloth to remove any dust. Grab some artificial leaves, the small kind in reds, oranges, and yellows, like maple or oak, about 10-15 to cover the lower half. Pour some Mod Podge into a cup, dip your foam brush, and get ready.
Brush a thin layer of Mod Podge on the back of a leaf, then press it onto the jar’s outside, starting near the bottom. Smooth it down so it sticks flat, no wrinkles. Keep going, overlapping leaves slightly, until the bottom half’s covered, leaving the top clear for light to shine out. Let it dry for 20-30 minutes. Brush a light coat of Mod Podge over the leaves to seal them, keeping it thin to avoid drips. Let it cure for an hour, standing upright.
Pour 1-2 cups of sand into the jar’s bottom, just enough to steady a tealight. Drop in a real tealight for that golden flicker, or an LED if you’re playing it safe. Light it up, and the glow spills out above the leaves, warm and rustic.
The finished jar feels like a crisp fall night bottled up, perfect for a porch or table. It’s an easy craft that packs a cozy punch, lighting up any spot with seasonal charm.
14. Happy Mother’s Day Vase
Turn a jar into a Mother’s Day gift with a spot for a fresh flower, and you’ve got a winner. It’s an easy, thoughtful way to brighten her day, perfect for any mom who loves a bit of spring indoors.
Materials List
- Mason Jar: Standard pint-sized (16 oz) glass mason jar (no lid needed).
- Acrylic Paint: One color (e.g., white, pink, or blue), about 2-4 oz, suitable for glass.
- Paintbrush: Medium, for painting the jar.
- Marker: Permanent, for writing “Happy Mother’s Day”.
- Fresh Flower: One stem (e.g., rose, daisy).
- Rubbing Alcohol: A small amount (1-2 oz) and a cloth to prep the jar.
Make a Mother’s Day vase from a mason jar that’s simple yet sweet, ready to hold a fresh flower for her. Wipe out the inside and front of your jar with a cloth to remove any dust. Pick a paint color she’d love, maybe white, pink, or blue, something soft and springy. Pour some acrylic paint onto a paper plate, dip your brush, and coat the outside of the jar evenly. Two coats should do it, letting each dry 15-20 minutes, until it’s smooth and solid. Let it cure for an hour.
Grab a permanent marker and write “Happy Mother’s Day” across the front, big and clear, or small and curly, whatever feels right. Practice on paper first if you’re shaky. Let the ink dry for a few minutes so it doesn’t smudge. Fill the jar halfway with water, then snip a fresh flower stem—like a rose or daisy—to fit, about 6-8 inches long, and drop it in.
The finished jar is a little vase with a big heart, that painted finish and message making it a perfect mom gift.

