You’ve probably experienced that familiar feeling of stepping into your craft room only to find chaos instead of creativity. I’ve been there too, searching through piles of fabric, hunting for that perfect paintbrush, or discovering dried-up markers that should’ve been replaced months ago. Regardless of whether you’re working with a dedicated studio or a corner of your dining room, getting organized isn’t just about tidying up; it’s about creating a space where your creativity can truly flourish. Let’s delve into how to transform your crafting area into an efficient and inspiring haven.
Highlights
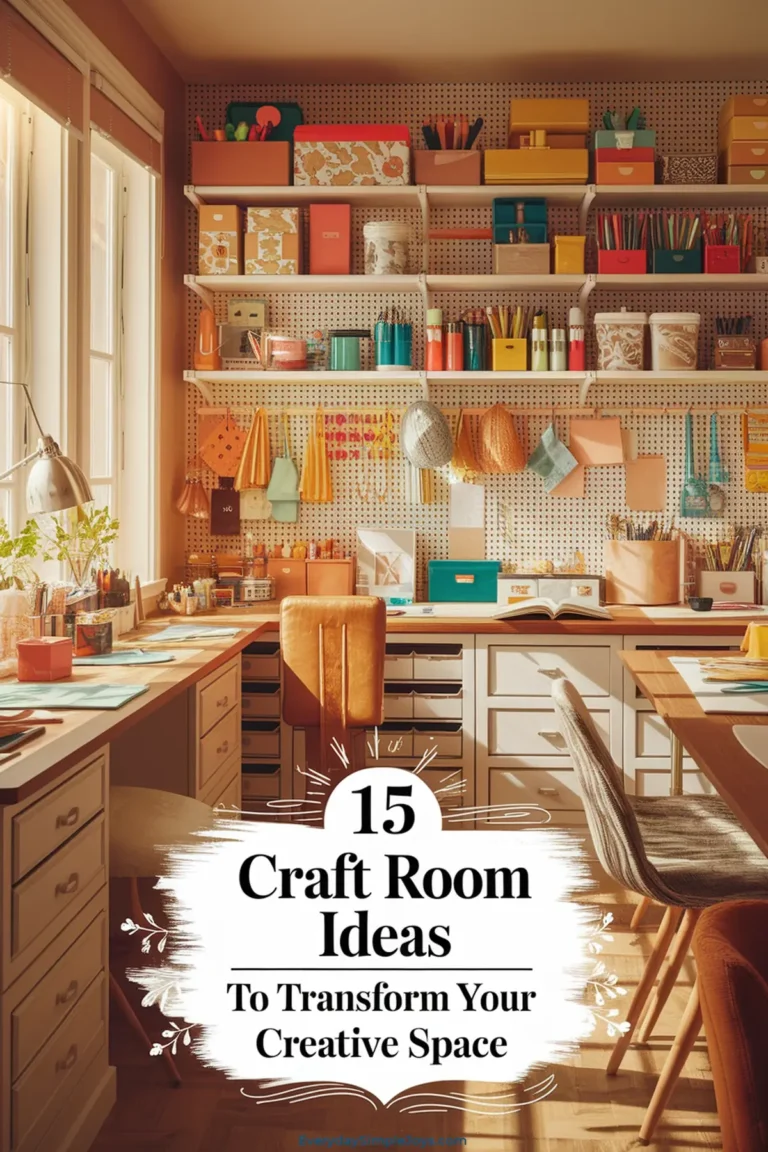
Create distinct work zones for different crafting activities, positioning the main workstation near windows for optimal natural lighting.
Install versatile storage solutions like pegboards, clear drawers, and labeled bins to maximize vertical space and maintain visibility.
Group supplies by craft type and implement a color-coded system with clear labels for easy identification and access.
Establish a clutter-free workspace with designated areas for active projects and convenient tool storage within arm’s reach.
Maintain organization through regular 10-minute cleanup sessions after crafting and schedule weekly decluttering to manage supplies.
Essential Steps Before Starting Your Craft Room Makeover
Before plunging into your craft room makeover, you’ll want to tackle some essential prep work that will make the whole process smoother and more enjoyable.
Start by taking a good look at your space. Really assess what’s working and what’s not. Consider things like natural lighting, where your power outlets are, and if you’ve got enough room to spread out on those bigger projects.
Next, you’ll need to be honest with yourself about your crafting habits. I’ve learned that comfortable seating is a must for those marathon crafting sessions.
Take measurements, snap some photos, and jot down notes about your dream setup. Trust me, this initial planning phase will save you from headaches later when you’re deciding where everything should go.
Strategic Space Planning and Room Layout
Once you’ve got a solid plan in place, it’s time to tackle the exciting part of mapping out your craft room’s layout.
Think of your space as a blank canvas where every inch counts. You’ll want to create distinct zones that flow together while maximizing both natural and artificial light.
To make the most of your craft room, focus on these game-changing strategies:
- Position your main workstation near a window to take advantage of natural light (your eyes will thank you later).
- Create dedicated zones for different crafts, keeping supplies close to where you’ll use them. For example, having a sewing station right next to fabric storage.
- Use vertical space with wall-mounted storage and adjustable shelving to keep your workspace clutter-free and super functional.
Remember to leave enough room to move around comfortably between your craft zones.
Your perfect layout should feel natural and intuitive!
Smart Storage Solutions for Every Budget
Three game-changing storage solutions can transform your craft room without breaking the bank.
You’ll love how stackable clear plastic drawers keep your supplies visible while maximizing vertical space. They’re perfect for everything from tiny beads to bulky fabric rolls, and you can easily customize them with DIY dividers.
Don’t overlook the treasure trove of storage possibilities at dollar stores and thrift shops. Those vintage hardware drawers you’ll spot for a few bucks? They’re ideal for organizing smaller items, and you can jazz them up with decorative paper to match your style.
For the ultimate budget-friendly fix, try crafting custom dividers from wooden slats or cardboard. They’ll keep your drawers tidy and your supplies sorted just the way you want them.
Creating Dedicated Work Zones and Activity Areas
Having your supplies neatly stored is just the starting point.
Now let’s make your craft room truly work for you! Think about how you’ll use your space and create zones that match your creative flow.
I’ve found that dedicated areas for different activities help prevent those “where did I put that?” moments we all dread.
Set up your craft room success with these key zones:
- A cutting and measuring station with a large, stable surface and nearby rulers
- A creation zone featuring your most-used tools within arm’s reach
- A finishing area with space for drying, pressing, or assembling final pieces
Position these zones in a logical sequence, just like you’d tackle a project.
You’ll love how much smoother your crafting sessions become when everything has its perfect spot!
Maximizing Vertical Storage Opportunities
When your craft room feels cramped but you’re not ready to expand, looking up reveals a goldmine of untapped storage potential.
You’ll be amazed at how much space you can create by thinking vertically!
Start with stackable shelves that let you customize heights for different supplies. Add hanging bins and wall-mounted cabinets to keep your most-used items within arm’s reach.
Don’t forget those often-overlooked corners, they’re perfect spots for corner shelves that’ll hold your favorite craft supplies.
For a budget-friendly approach, try some DIY solutions. Transform wooden crates into charming tiered storage, or mount repurposed pallets for a rustic display wall.
You can even create custom organizers using PVC pipes (they’re surprisingly versatile and perfect for storing rolls of vinyl or wrapping paper).
Organizing Supplies by Category and Color
A well-organized craft room starts with smart categorization and color coding that will make finding supplies a breeze.
When you’re in the middle of a creative flow, you don’t want to waste time hunting for that perfect paintbrush or specific shade of ribbon.
Create your organization system:
- Group similar items together: keep your paints, brushes, and painting supplies in one zone, while your sewing materials stay in another
- Use color-coded containers with clear labels: blue bins for paper crafts and red ones for painting supplies
- Store frequently used items at eye level: you’ll thank yourself later when you’re reaching for those everyday essentials
Remember to maintain your system by returning items to their designated spots after each crafting session.
Cost-Effective Organization Hacks and Tips
Organizing your craft room doesn’t need to drain your wallet. You’ll be amazed at how many storage solutions are hiding in plain sight! Transform those Amazon boxes into stylish containers with decorative paper, and turn Dollar Tree wooden crates into custom shelving units that will make your crafting friends jealous.
Get creative with vertical space by installing an affordable pegboard system or hanging shoe organizers; they’re perfect for storing everything from paint bottles to ribbon spools.
For smaller items, grab some lock-top containers from the dollar store and create labeled sections for beads, buttons, and brushes.
Don’t forget to check out modular storage units that can grow with your collection. I’ve found that stackable drawer systems are absolute lifesavers when it comes to maximizing space while keeping your budget intact.
Maintaining Order in Your Creative Space
Maintaining Order in Your Creative Space
Once you’ve set up your perfect craft room organization system, keeping it tidy becomes your next creative project.
Just like any masterpiece, maintaining an organized space requires consistent attention and a dash of creative problem-solving. You’ll find it’s actually fun to keep your craft zone tidy when you’ve got a solid plan in place.
Three game-changing habits that’ll help you maintain your crafty paradise:
- Set aside 10 minutes after each crafting session to return supplies to their designated homes.
- Schedule a weekly mini-declutter to prevent random items from piling up.
- Review your storage solutions monthly and adjust them based on your current projects.
Time-Saving Systems for Long-Term Success
Smart time-saving systems can transform your craft room from chaotic to super efficient, making every creative session more enjoyable.
You’ll love how a color-coded system lets you grab supplies in seconds, while keeping your most-used items within arm’s reach saves countless steps during projects.
Set up a “ready-to-go” kit for those spontaneous creative moments, and you’ll never waste time hunting down basic supplies again.
Mobile carts are game changers. Just roll your materials wherever inspiration strikes!
Don’t forget to create designated zones for different activities; it’s like having mini craft stations at your fingertips.
When you’re done, a quick 5-minute cleanup routine keeps everything in check.
Trust me, these simple systems will give you more time to focus on what really matters: bringing your creative ideas to life.
Summary
Your craft room can transform from chaotic piles to organized style with these practical solutions. While scattered supplies might feel overwhelming now, you’ll soon enjoy a space where creativity flows freely. Just imagine: yesterday’s jumbled mess becomes tomorrow’s inspiring sanctuary. Remember, you don’t need to tackle everything at once. Start small, stay consistent, and watch your craft room evolve into the organized oasis you’ve always wanted.