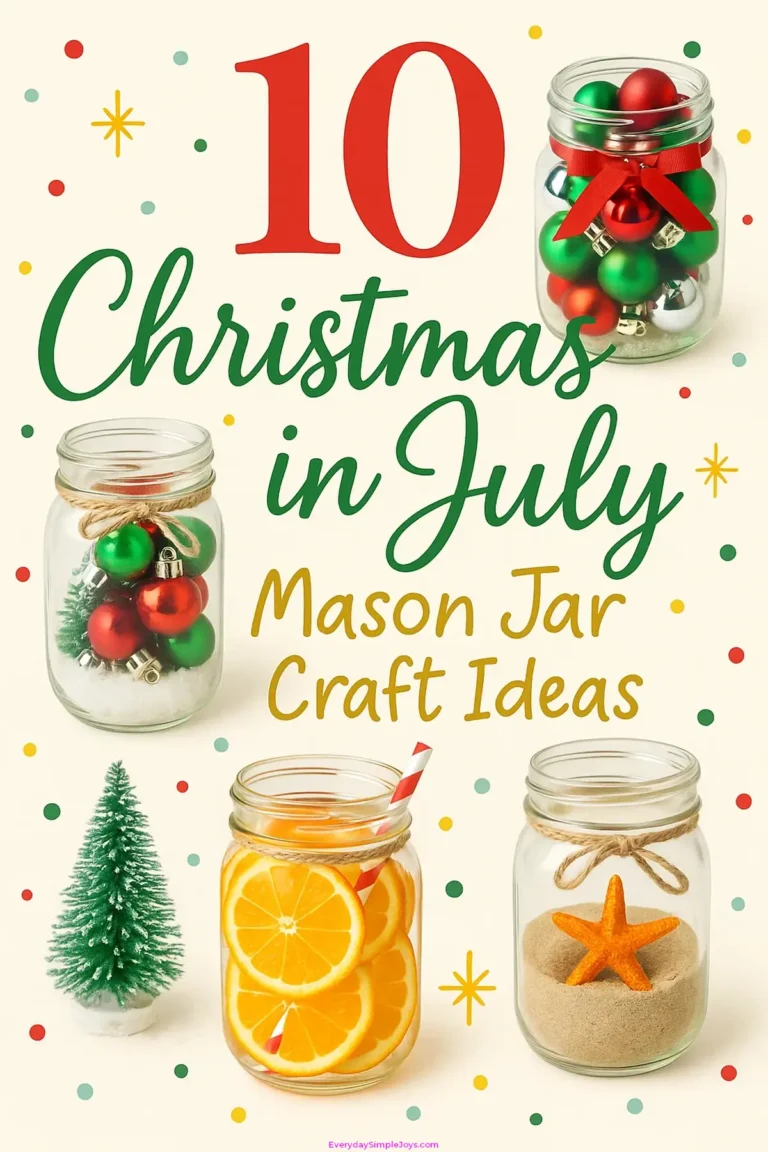
Did you know that over 70% of Americans participate in some form of summer holiday crafting? If you’re looking to beat the heat while getting ahead on your Christmas preparations, mason jar crafts offer the perfect creative outlet. You’ll find these versatile glass containers transform into everything from sparkling snow globes to practical gift vessels. With just a few basic supplies and some imagination, you can start building your holiday collection now without the December rush.
Highlights
Create beach-themed Santa mason jars using white paint for his beard and add tiny seashells or starfish for summer flair.
Layer red and white sand in clear mason jars to create candy cane stripes, topped with miniature tropical decorations.
Transform mason jars into summer snow globes using waterproof glitter, beach elements, and festive holiday figurines.
Paint mason jars with chalk paint in traditional Christmas colors, then add summer elements like flamingos wearing Santa hats.
Design luminaries using weatherproof LED lights and combine pine branches with seashells for a summer-meets-Christmas aesthetic.
Why Mason Jars Are Perfect for Christmas in July Crafts
Five key qualities make mason jars the ideal choice for Christmas in July crafts. You’ll find these versatile containers are surprisingly affordable, allowing you to stock up during summer craft store sales.
Their durability means you can experiment confidently with various techniques, from painting to glittering, without worrying about damage.
Mason jars’ reusability aligns perfectly with sustainable crafting practices, while their classic design provides an excellent canvas for both traditional and modern holiday themes.
The variety of sizes available lets you create everything from tiny ornaments to grand centerpieces. You’ll appreciate how these containers seamlessly blend rustic charm with contemporary style, making them perfect for any holiday vision you have in mind.
Starting your Christmas crafting in July gives you time to perfect your designs, take advantage of seasonal sales, and transform these simple glass containers into stunning holiday decorations that’ll impress at craft fairs or as personalized gifts.
Essential Materials for Your Mason Jar Holiday Projects
You’ll need basic tools like brushes, scissors, and protective gear to safely handle your Mason jar projects.
For a successful crafting session, stock up on essential adhesives like Mod Podge and various paints to create the perfect holiday finishes.
Keep your materials organized in clearly labeled containers, making sure to separate delicate items like glitter and small decorative pieces for easy access during your creative process.
Basic Tools and Supplies
Before plunging into your Christmas in July mason jar projects, gathering the right tools and supplies will guarantee smooth crafting sessions.
You’ll need basic cutting tools like scissors and a craft knife for precise trimming of your decorative materials. A hot glue gun is essential for securing heavier items like pinecones and ornaments, while glue sticks work perfectly for lighter elements such as scrapbook paper and stickers.
Stock up on various-sized mason jars and clear glass containers to accommodate different project scales.
Don’t forget decorative essentials like glitter, ribbons, and artificial flowers to create that festive holiday charm. Wire cutters come in handy when you’re working with metallic elements or creating custom hangers.
For added inspiration, explore printables and online tutorials to spark your creativity and discover innovative techniques.
Paint and Adhesive Options
Now that you’ve gathered your basic supplies, selecting the right paints and adhesives will make or break your mason jar holiday projects.
Choose from acrylic craft paint for vibrant designs, chalk paint for a trendy matte finish, or glass paint for superior durability. For a metallic Christmas sparkle, opt for gold or silver spray paint.
Before painting, prep your jars with rubbing alcohol and hot soapy water. Apply thin coats, letting each layer dry completely.
Paint the exterior for water resistance, or create decorative interior designs for non-food use. Secure your embellishments with Mod Podge for paper elements, hot glue for ribbons, or epoxy resin for heavier decorations.
Don’t forget to seal your work with a clear coat to prevent chipping and guarantee your Christmas in July creations last through the summer heat.
Storage and Organization Tips
Staying organized while crafting Christmas mason jar projects can make the difference between a joyful and frustrating experience.
Set up a dedicated workstation with clear containers for your glitter, decorations, and small embellishments. You’ll want to store these items in labeled ziplock bags to prevent mixing and spillage.
Keep your mason jars and larger materials on designated shelves, and use project boxes to group supplies for specific crafts.
Store scissors, glue, and other frequently used items in easily accessible organizers. Store ribbon, twine, and printable tags in clear containers so you can quickly spot what you need.
Consider using a simple checklist to track your materials and maintain a crafting schedule that will keep your holiday projects on track.
Creating a Winter Wonderland Snow Globe Jar
Transform an ordinary mason jar into a magical winter wonderland snow globe that captures the enchantment of a snowy Christmas scene.
Start by thoroughly cleaning your jar and gathering waterproof supplies: epoxy glue, distilled water, glycerin, and your choice of miniature decorations.
If you’re using artificial trees, soak them overnight to prevent dye bleeding, then dry them completely on paper towels.
Secure your scene elements to the jar’s lid using waterproof glue, arranging them to create depth. You can opt for a classic forest scene with tiny animals or design an urban landscape with buildings and vehicles.
Mix distilled water with glycerin for the perfect snow-falling effect, then add a sprinkle of glitter or artificial snow.
When you’re satisfied with your arrangement, seal the lid tightly.
For an innovative twist, consider incorporating LED lights or trying waterless alternatives like sugar or craft snow to achieve your desired winter wonderland effect.
Festive Santa Belt and Snowman Designs
Transform ordinary mason jars into charming holiday characters by painting the interior white for snowmen or wrapping red ribbon around the middle for Santa’s belt.
You’ll bring your snowman to life with simple black buttons for eyes, an orange pom-pom nose, and a miniature felt top hat, while the Santa belt design comes together with a black cardstock buckle and optional metallic accents.
The classic red-and-white color scheme works perfectly for both designs, letting you create matching sets or mix-and-match holiday displays that sparkle with LED tea lights.
Easy Snowman Painting Steps
Creating a charming snowman mason jar begins with five essential materials: white and black paint, red felt, buttons, and sandpaper.
You’ll transform ordinary jars into delightful winter decorations by applying two coats of white paint, followed by black accents for personality.
Paint facial features directly on the jar or create them on a separate ornament for a unique, customizable look.
Distress the raised edges with sandpaper to add texture and dimension that mimics real snow.
Wrap a red felt scarf around the jar’s neck and secure it with glue for a cozy touch.
Top your creation with a miniature black felt hat and add buttons down the front.
For a professional finish, remember to let each paint layer dry completely and seal your work if it’ll be exposed to moisture.
You’ll love how these whimsical decorations brighten your space.
Santa Belt Design Tips
The magic of a Santa-themed mason jar comes alive with a perfectly crafted belt design. Start with 3/4-inch-wide red grosgrain ribbon for durability, then layer black ribbon on top to create that classic leather belt look.
Fashion a gold cardstock buckle and secure it with hot glue at the center.
You’ll want to position your belt design between the jar’s neck and mid-body for the best visual impact.
Get creative with add-ons like jingle bells or holly sprigs using thin floral wire. For budget-friendly options, try gold washi tape instead of cardstock buckles, or upcycle fabric scraps for the belt material.
Consider making your design modular with removable glue dots, so you can swap elements between snowman and Santa themes throughout the season.
Festive Color Combinations
When planning your Christmas in July mason jar designs, selecting the right color combinations can make your creations truly pop. Transform classic winter themes into summer-friendly displays by pairing traditional Christmas colors with fresh, seasonal twists.
Mix candy cane stripes with ice blue accents, or blend golden touches with pristine white for an elegant look that bridges both seasons.
- Combine red and green with snow white for a classic-meets-modern approach that works perfectly on mason jar snowmen.
- Layer ice blue and white paint inside jars to create a frosty effect that catches summer light.
- Add sparkle with golden accents against white backgrounds for sophisticated appeal.
- Use candy cane colors (red and white stripes) for playful designs that evoke holiday charm.
These versatile color combinations work beautifully with both Santa belt and snowman-themed mason jar crafts.
Crafting Edible Gift Jars With Holiday Flair
Since Christmas-themed mason jar gifts bring joy year-round, crafting edible holiday treats in July lets you get ahead of the seasonal rush while perfecting your recipes.
Transform simple mason jars into festive gifts by layering brownie mixes with peppermint bits, creating breakfast granolas with dried cranberries, or assembling spiced nuts with cinnamon and cayenne.
You’ll want to start with heavier ingredients at the bottom, working your way up to lighter mix-ins like holiday M&Ms or sprinkles.
For ideal presentation, alternate contrasting colors and textures to create visual impact.
Don’t forget to add silica gel packets under the lids in humid weather, and include clear allergen labels for safety.
Complete your creation with holiday ribbons, custom recipe tags, and themed labels.
These thoughtful gifts will stay fresh for 3-6 months when properly sealed, giving you plenty of time to perfect your holiday gifting strategy.
Mason Jar Holiday Luminaries and Light Displays
Creating magical holiday luminaries from mason jars offers a perfect way to blend summer crafting with winter wonderland ambiance. Transform your space with these versatile decorations by combining battery-operated LED lights with seasonal embellishments.
You’ll want to prep your jars carefully, removing all labels and ensuring they’re completely dry before starting your creative journey.
Mix traditional and coastal elements by filling jars with beach sand and starfish, then wrapping them with red and white twine for a patriotic Christmas twist.
Layer burlap and lace to create depth, securing decorative elements with hot glue for lasting appeal.
Add weatherproof micro LED string lights for safe, long-lasting illumination that’s perfect for indoor or outdoor displays.
Experiment with stenciled snowflakes or painted holiday motifs to customize your designs.
Group your luminaries in varying heights, or create a stunning pathway display that’ll wow your guests during summer evening gatherings while capturing that festive December spirit.
Natural Elements: Pine and Berry Holiday Jars
Natural elements bring the outdoors inside, transforming simple Mason jars into enchanting holiday décor that perfectly complements your luminaries.
You’ll create stunning displays by layering fresh pine branches with vibrant berries, capturing the essence of winter’s beauty in glass.
Start with a clear Mason jar and add decorative stones as your base. Layer in fresh pine branches or opt for painted pine motifs if you’re planning long-term use.
Add pops of color with dried cranberries, holly berries, or their artificial counterparts. For extra winter magic, sprinkle in some faux snow or glitter between the layers.
Secure pinecones to the jar’s exterior or lid using hot glue, then wrap twine or elegant ribbon around the rim.
Enhance the sensory experience by incorporating pine or berry-scented potpourri. You can display these versatile pieces indoors on mantles and tables, or weatherproof them for outdoor enjoyment during summer celebrations.
Kid-Friendly Mason Jar Christmas Projects
These five kid-friendly Mason jar projects bring Christmas joy to life while keeping little hands busy and creative minds engaged. Transform everyday jars into magical holiday crafts using simple techniques that’ll spark your child’s imagination.
From painting Santa’s jolly red suit to creating a miniature winter wonderland, these projects offer endless possibilities for creative expression.
Set up an engaging craft station with dollar store supplies, allowing kids to personalize their jars with stickers, paint, and felt decorations. Turn jar decorating into a family competition, where everyone creates their own unique holiday character or scene.
Pack jars with cookie mix and decorating supplies for a gift that doubles as an interactive baking activity. Create a snowman village display using multiple jars, encouraging teamwork and storytelling.
Get started with basic supplies like acrylic paint, glue, and recycled materials. You’ll find these projects perfect for holiday parties, classroom activities, or cozy crafting afternoons at home.
Mason Jar Gift Packaging Tips and Tricks
You’ll want to start with properly sealing your mason jar gifts using the two-part lid system or decorative alternatives that guarantee contents stay fresh and secure.
When wrapping your jars, consider layering different textures like burlap, ribbon, or tissue paper while leaving enough space at the top for eye-catching embellishments.
Position your gift tags strategically by hanging them from the neck of the jar or securing them under the lid’s band where they’ll be prominently displayed without interfering with the overall design.
Secure Sealing Methods
While creating charming Christmas in July mason jar gifts, proper sealing techniques guarantee your treasures stay fresh and secure.
You’ll want to master these innovative sealing methods to make certain your holiday treats and crafts maintain their quality during the warm summer months.
- Secure jar lids just until snug, because overtightening can prevent proper air venting and compromise the seal.
- Let the sealing compound work its magic by heating properly, creating an airtight barrier around the rim.
- Utilize modern vacuum sealing devices to achieve professional-grade results, especially for edible contents.
- Allow jars to cool undisturbed for 24 hours before checking seals; a firmly depressed, immobile lid indicates success.
Remember to inspect each jar for cracks or chips before sealing, particularly around the rim area.
These contemporary sealing methods will help your Christmas in July creations remain fresh and gift-ready.
Decorative Wrapping Solutions
Countless creative wrapping solutions can transform your Christmas in July mason jar gifts into stunning presentations that capture both winter charm and summer spirit.
You’ll find tissue paper particularly versatile, allowing you to create origami-inspired designs that add sophistication to your jars.
Layer different textures by combining burlap, lace, and natural fabrics for depth, then accent with biodegradable ribbons made from plant fibers.
Create eye-catching focal points using seasonal elements like pinecones or small ornaments, and don’t forget to incorporate both Christmas and summer colors for that perfect holiday-meets-sunshine appeal.
For an eco-conscious touch, opt for reusable wrapping materials like cotton or linen fabric scraps.
Complete your presentation with personalized gift tags and DIY embellishments that make each jar uniquely special while maintaining environmental responsibility.
Perfect Gift Tag Placement
The strategic placement of gift tags can make or break your Christmas in July mason jar presentation.
You’ll want to position your tags where they’re most visible while maintaining the jar’s aesthetic appeal. Consider placing smaller tags directly on the lid for a clean look, or attach fuller labels to the jar’s side for maximum impact.
Make certain your placement aligns with any decorative elements you’ve already added.
- Position tags at eye level on the jar’s side for immediate visual impact
- Conceal seams or tape edges by strategically overlapping your tags
- Layer ribbons and tags together at the neck of the jar for dimension
- Use the lid’s center as a focal point for round, decorative tags
Before attaching your tags, verify the jar’s surface is clean and dry for best adhesion.
Preserving Your Mason Jar Holiday Creations
Making beautiful Christmas in July mason jar crafts is only half the battle. Preserving them properly guarantees your creations stay festive year after year.
To protect your masterpieces, start by applying a clear acrylic sealant spray or UV-protective varnish to shield painted surfaces from fading and scratches.
Store your jars in a cool environment below 70°F with silica gel packets to prevent moisture damage. If you’ve used fabric elements or paper decorations, secure them with Mod Podge before final storage. For food-based gifts, confirm you’re using food-safe sealants and airtight lids.
Don’t forget to implement a rotation system for displayed pieces to minimize light exposure. Clean with microfiber cloths and add soft padding between stored jars to prevent scratches.
For long-term preservation, reapply sealants annually and use rust-prevention sprays on metal components. Consider adding cedar sachets to storage areas to protect organic materials from pests.
Summary
While you’re sweating through July’s heat waves, you’ll be crafting snowy winter wonderlands in glass. Isn’t it ironic that these humble Mason jars, originally meant for preserving summer’s bounty, now capture December’s magic in the middle of beach season? Don’t wait for winter. Start creating these festive containers now. When December finally arrives, you’ll have already bottled up all that Christmas cheer.