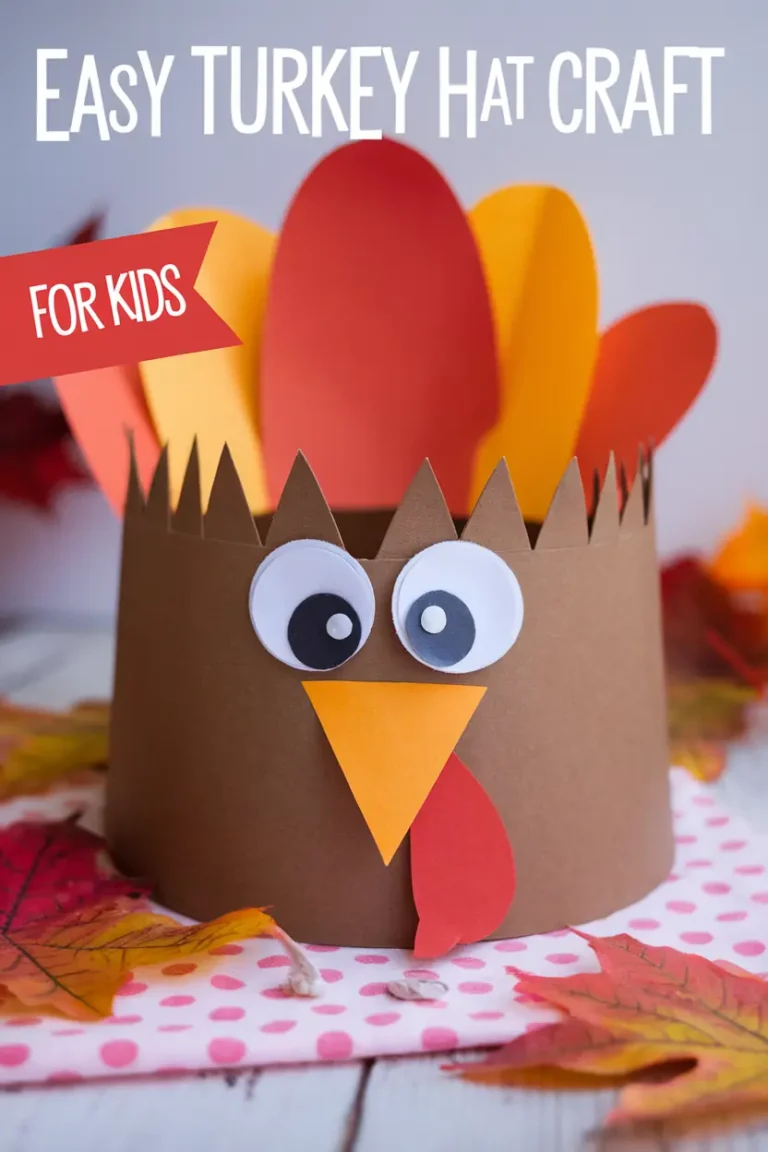
Thanksgiving is all about family time, and what better way to celebrate than crafting cute Turkey Hats with the kids? These easy and adorable Festive season hats are more than just a fun activity – they’ll also have your kids beaming with pride in their homemade creations.
These Easy Thanksgiving Crafts are perfect for little ones to enjoy, whether it’s a simple Turkey Headband or a full-on Big Turkey Hat Craft.
Not only are these hats fun to make, but they’re also great for Thanksgiving photos, creating memories that last. Gather the kids, pull out the craft supplies, and let’s make some festive, feathered fun!
Why You’ll Love This Article:
- Fun for the Whole Family: A craft that siblings of all ages can enjoy together.
- Quick and Easy Prep: Most crafts take under 30 minutes and require minimal setup.
- Memory-Making Moments: Perfect for those Thanksgiving photo ops!
- Creative and Meaningful: These hats celebrate Thanksgiving in a way kids can connect with.
Simple DIY Turkey Hat Ideas for Kids
- Classic Turkey Hat
- Create a classic turkey hat with a simple headband base, colorful paper feathers, and a turkey face on the front. Kids can add googly eyes, a beak, and a wattle for extra character.
- This easy craft requires minimal supplies and works great as a Thanksgiving Hat Craft for large groups or classroom activities.
- Minimal Supplies Turkey Headband
- If you’re short on materials, go for a quick turkey headband with just paper strips, markers, and some glue. Kids can draw the face and feathers right on the headband.
- Perfect for Easy Preschool Thanksgiving Crafts that need to be quick and simple.
Materials Needed for Turkey Hat Crafts
To make this cute turkey hat, you’ll need:
- Construction Paper:
- Brown for the main headband.
- Orange and Red for the beak and wattle.
- Yellow and Red for the feathers.
- White Paper: For the eyes.
- Black Marker or Black Construction Paper: For the pupils on the eyes.
- Glue Stick or White Glue: To attach the pieces together.
- Scissors: For cutting out the shapes.
- Stapler or Tape: To secure the headband.
Step-by-Step Guide: How to Make a Basic Turkey Hat
Follow these easy steps to make a turkey hat that’s perfect for Thanksgiving!
Step 1: Create the Headband Base
- Cut a strip of brown construction paper about 2–3 inches wide. The strip should be long enough to fit around the child’s head.
- If one strip isn’t long enough, cut two strips and attach them together with glue or tape to make a longer headband.
- Wrap the strip around the child’s head to get the right fit, then secure the ends with tape, glue, or a stapler. This will be the base of the Turkey Headband.
Step 2: Cut Out the Turkey’s Face
- Eyes: Cut two circles from white paper for the eyes. These should be about the size of a quarter.
- Pupils: Use a black marker to draw a circle in each white eye circle for the pupils. Alternatively, cut small black circles from black construction paper and glue them onto the white circles.
- Beak: Cut a small triangle from orange construction paper for the beak.
- Wattle: Cut a tear-drop shape from red construction paper for the turkey’s wattle (the part hanging next to the beak).
Step 3: Attach the Turkey’s Face to the Headband
- Glue the eyes to the front of the headband. Place them close together in the center.
- Just below the eyes, glue the orange triangle (beak).
- Attach the red wattle slightly to one side of the beak, so it hangs down in a fun way.
- Allow a few minutes for the glue to dry to make sure everything is secure.
Step 4: Create and Attach the Feathers
- Using yellow, red, and orange construction paper, cut out feather shapes. Each feather should be about 4–6 inches long and slightly pointed at the top, similar to a leaf shape.
- For added detail, fold each feather down the middle lengthwise to give it a slight crease, adding texture and dimension.
- Arrange the feathers at the back of the headband, fanning them out. Glue or tape each feather securely so they stand upright when worn. You can layer the colors (red, orange, yellow) for a more vibrant look.
Step 5: Final Assembly and Adjustments
- Once all parts are attached, double-check that the headband fits comfortably around the child’s head. Make any adjustments if needed by adding or shortening the brown headband strip.
- Ensure that the glue on all pieces is dry before the child tries on the hat. This keeps everything in place and prevents the decorations from falling off.
Estimated Time to Make the Turkey Hat
- Preparation (cutting shapes): 5-10 minutes. This includes cutting the headband, feathers, eyes, beak, and wattle. If you’re pre-cutting these for younger children, it may be closer to 5 minutes.
- Assembling the Headband and Face: 5 minutes. This involves gluing or taping the headband and attaching the face pieces (eyes, beak, and wattle).
- Attaching Feathers and Final Details: 5-10 minutes. Add the feathers to the back of the headband, using glue or tape, and let everything dry.
- Drying Time: About 5 minutes if using glue. Double-sided tape or a glue stick can speed up this process as they dry faster.
So, from start to finish, expect 20-30 minutes to complete the turkey hat, making it a quick, fun activity for kids. If you’re working with a group or adding extra decorations, you might want to allow a few additional minutes..
Tips for Making It Suitable for Different Ages
- Preschoolers: Pre-cut all shapes (feathers, eyes, beak, and wattle) to make the process quicker and easier. Let them decorate and assemble with glue.
- First Graders: Let older kids cut their own feathers and other shapes. They may enjoy adding extra details, like drawing lines on the feathers or using different colors.
Additional Tips to Make Your Turkey Hat Perfect
- Use Sturdy Construction Paper: Thicker paper or cardstock works best to make sure the hat holds its shape and stands up to lots of wear.
- Fit the Headband Before Gluing: Wrap the headband around your child’s head to check the length before securing it. This makes sure it fits comfortably and won’t slip off.
- Extra Glue for Feathers: Feathers sometimes need a bit more glue to stay upright. Add a little extra at the base of each feather or use tape on the back if needed.
- Let Kids Create Their Own Expressions: Kids can have fun drawing their turkey’s face! Encourage them to make it unique with different expressions.
- Safety First for Little Crafters: When working with preschoolers, supervise scissor use and pre-cut pieces if needed. You can also staple the headband for them to keep things safe.
Use This Template to Make Your Turkey Hat Craft Easy!
Here, I’ll provide a simple template image that shows each piece you’ll need to cut out for the turkey hat – from the headband base to the eyes, beak, wattle, and feathers. Use this image as a guide to help you make the perfect turkey hat.
Simply follow the shapes and sizes shown, and feel free to adjust them as needed for your child’s head size. This template will make each step clear, so you and your little ones can enjoy a fun and stress-free crafting experience!
Mistakes to Avoid While Making This Turkey Hat
- Not Measuring the Headband Properly
- One common mistake is not measuring the headband around the child’s head before securing it. If the headband is too tight, it will be uncomfortable, and if it’s too loose, it may slip off. Make sure to wrap it around the child’s head to get the right fit before gluing or stapling.
- Using Too Much Glue on the Feathers
- Applying too much glue can make the feathers heavy and cause them to flop forward or not stick well. Use just enough to secure them at the base and add a little extra on the back if needed. Avoid spreading glue along the whole feather as it can create a sticky mess.
- Not Allowing Glue to Fully Dry
- Kids might be excited to try on their turkey hats right away, but if the glue isn’t fully dry, the pieces can shift or fall off. Give the hat a few extra minutes to dry before trying it on, especially for the feathers and face pieces.
- Skipping Sturdier Materials
- Using thin paper for the headband can make it too flimsy, especially if the hat will be worn for a long time. Opt for thick construction paper or cardstock for a more durable headband that holds up better.
- Incorrect Feather Placement
- Be mindful of the feather placement so that they’re well-centered and fan out nicely. Placing them too close together can make them look clumped, while placing them too far apart may not give the full look you want.
Pro Tips to Make the Turkey Hat Extra Special
- Use Double-Sided Tape for Faster Assembly
- For quicker and cleaner assembly, consider using double-sided tape instead of glue for attaching the face and feathers. This eliminates drying time and helps keep everything securely in place.
- Add a Fold to the Feathers for Dimension
- To make the feathers look more realistic, fold each one down the center lengthwise. This small fold gives them a bit of dimension, making the hat look more polished and visually interesting.
- Layer Different Feather Colors
- Alternate colors for the feathers (like red, orange, and yellow) to create a more vibrant, full look. Layering different colors adds depth and makes the hat stand out.
- Personalize with a Name or Initials
- Let kids personalize their turkey hat by writing their name or initials on the headband. This adds a personal touch, especially if you’re making these hats with a group of kids.
- Use a Hole Punch for Easy Feather Attachment
- For extra security, punch small holes at the base of each feather and the back of the headband, then tie them together with a small piece of yarn or string. This keeps the feathers more stable, especially if kids will be moving around a lot.
- Add Glitter or Stickers for Extra Fun
- If you want a little extra sparkle, let kids add glitter to the feathers or use fun stickers on the headband. This is a great way to let them personalize their turkey hat even more.
- Let Kids Draw Their Own Turkey Expressions
- Encourage kids to draw their own turkey faces with different expressions.
- Some may want a happy turkey, while others might prefer a funny or surprised look. This creative freedom makes the project more engaging for them.
Turkey Hat Variations to Try
Adding a twist to the classic turkey hat is a great way to keep kids engaged and let them personalize their creations. Here are some creative variations to try!
- Turkey Headband Craft
- For a simpler option, make a Turkey Headband instead of a full hat. Start with a strip of brown construction paper as the base and add just a couple of paper feathers and a face in the front.
- This version is lighter and sits comfortably on younger kids’ heads, making it ideal for Thanksgiving Hats for Preschoolers or November Preschool activities.
- Thanksgiving Headbands with Seasonal Designs
- Take your turkey hat to the next level by adding other Thanksgiving-themed details, like autumn leaves, small pilgrim hats, or acorns. Use fall-colored paper or small decorations to make it more festive.
- This Thanksgiving Headband can be a fun twist on the traditional turkey hat and brings a seasonal touch to the craft.
- Potato Turkey Craft
- For a sturdy, fun variation, make a Potato Turkey Craft! Use a small, lightweight potato as the base. Wrap a headband or paper strip around the potato, and then add paper feathers and a turkey face.
- This craft is unique, durable, and works well as a tabletop decoration or a playful twist on the usual Thanksgiving Hat.
- Handprint Turkey Hat
- For a personal touch, try a Handprint Turkey Hat. Trace the child’s handprints on colorful paper to use as feathers, then glue these handprints to the back of the headband.
- This option is a sweet keepsake, capturing each child’s handprint. It’s a meaningful project for both parents and kids, perfect for Thanksgiving Crafts Preschool and Easy Thanksgiving Crafts for toddlers.
Creative Add-Ons for Turkey Hats
Take your turkey hats up a notch with these fun add-ons! These creative touches make each hat unique and add a bit of extra excitement for kids.
Turkey Snack Craft
- Turn the turkey hat into a Turkey Snack Craft by attaching small snacks like popcorn, candy corn, or pretzels to the feathers or around the rim of the hat. Use a dab of glue or double-sided tape to secure the snacks.
- This add-on makes the hat even more fun to wear (and nibble on!) during Thanksgiving gatherings. Kids will love showing off their “snack hat” and enjoying a treat at the same time.
Pilgrim Hat Craft Preschool
- Add a tiny Pilgrim Hat to your turkey’s head to give the hat a touch of historical flair. Use black construction paper to cut out a small hat shape, add a yellow buckle, and glue it on top of the turkey’s head.
- This is a great way to mix in a little history lesson with the craft, making it a perfect addition to Thanksgiving Crafts Preschool or Pilgrim Hat Craft Preschool activities.
Picture Turkey Craft
- Make the hat even more personal by adding a small family photo or picture. Simply print a small photo and glue it onto the front of the headband or inside a feather.
- This Picture Turkey Craft idea is a unique keepsake, helping kids celebrate Thanksgiving with family memories. It’s especially fun if you’re making turkey hats as a group or family activity.
Turkey Hat Crafts for Different Ages
Adjusting the turkey hat craft for different age groups ensures every child can have fun creating something that matches their abilities and interests. Here are some ideas tailored to toddlers, kindergartners, and first graders.
Thanksgiving Crafts for Toddlers
- For the youngest crafters, keep things super simple. Pre-cut all the shapes and let toddlers focus on decorating. They can color the feathers with crayons or markers and help stick them on with glue.
- To keep it safe, avoid using small items like googly eyes. Instead, draw on the turkey face with markers for a toddler-friendly version of a Turkey Hat for Preschool.
Thanksgiving Activities for Kindergarten and Preschool
- In a classroom setting, these hats make for excellent Thanksgiving Activities for Kindergarten. Have each child make their own headband, and let them choose colors for the feathers and turkey face. For a group activity, you could even set up a “turkey hat station” with materials ready for each step.
- Provide Turkey Template Printable Free resources to help them trace and cut, making it easier for teachers to manage the craft with a larger group.
Turkey Craft First Grade
- For older kids in first grade, add more detail by letting them cut and assemble all the pieces on their own. They can practice using scissors to cut out feathers, a beak, and a wattle, and get creative with layering different colors on the feathers.
- Consider giving them extra materials like glitter, mini pompoms, or stickers to customize their turkey hats. This Turkey Craft First Grade version can include more advanced cutting and gluing for kids ready to try a bit more.
Fun Thanksgiving Hat Alternatives
If you’re looking for a little variety or a twist on the classic turkey hat, these Thanksgiving hat alternatives are perfect options! They’re creative, easy to make, and fun for both individual crafts and group activities.
- Pilgrim Hats for Preschool
- A Pilgrim Hat is a fun alternative to a turkey hat and adds a bit of historical context to your Thanksgiving crafts. To make it, use black construction paper to form a simple hat band and brim, and add a small yellow or gold square in the center to represent a buckle.
- This craft is perfect for preschoolers and kindergarteners as it’s easy to assemble and requires minimal supplies. Pair it with turkey hats for a complete Thanksgiving look!
- Thanksgiving Handprint Craft
- For a personal touch, try a Thanksgiving Handprint Craft by making a handprint turkey hat! Instead of cutting out paper feathers, trace the child’s hand onto colored construction paper multiple times and cut out the shapes to use as “feathers.”
- Attach the handprint feathers to the back of the headband, fanning them out for a cute, keepsake turkey hat. This craft is ideal for young children and makes a wonderful memory for families to look back on.
- Big Turkey Craft
- For a group activity, a Big Turkey Craft can be a great option. Create one large turkey headband that multiple kids can help decorate. Use a large strip of paper as the base and have kids attach oversized feathers, decorations, and even their names or initials.
- This is perfect for classrooms or family gatherings where kids can work together. It’s also a fun way to create a Thanksgiving centerpiece that everyone can enjoy!
Tips for Using Turkey Hats in Thanksgiving Celebrations
Turkey hats are not only fun to make but are also great additions to Thanksgiving festivities. Here’s how to make the most out of these adorable hats in your holiday celebrations!
- Thanksgiving School Activity
- Turkey hats are perfect for a classroom activity and can even be part of a Thanksgiving school play! Kids can each make a turkey hat as a class project, and then wear them as they perform songs, poems, or share what they’re thankful for.
- These hats bring color and excitement to any Thanksgiving-themed school event, and they’re easy to make with a group. Plus, they make for cute, memorable keepsakes to take home!
- Photo Op Ideas
- Use turkey hats as a fun photo opportunity during Thanksgiving gatherings! Set up a small photo area with a Thanksgiving backdrop, and let kids (and adults!) pose in their turkey hats. It’s a wonderful way to capture family memories and add some playful spirit to your holiday photos.
- This is especially great for young kids who will enjoy the chance to show off their creations and smile for the camera.
- Kids Thanksgiving Parade
- Organize a mini Thanksgiving parade with kids wearing their turkey hats. Families can hold their own parade at home, or teachers can arrange one in the classroom. Kids can walk around, wave, and proudly display their hats for everyone to see!
- This fun, low-key activity is easy to set up and brings a sense of celebration to the day. It’s an ideal way for children to show off their unique designs, adding a festive atmosphere to Thanksgiving gatherings.
Common FAQs About Making Turkey Hats for Kids
- What materials do I need to make a turkey hat?
- You’ll need construction paper (in colors like brown, red, yellow, orange, and white), glue, scissors, a black marker, and a stapler or tape. Optional decorations like feathers, googly eyes, and glitter can add extra flair.
- Can I make this hat with younger kids?
- Yes! This turkey hat is perfect for preschoolers and kindergarteners. For toddlers, consider pre-cutting the shapes and letting them focus on gluing and decorating.
- How long does it take to make a turkey hat?
- It typically takes about 20-30 minutes, including time to cut out shapes, assemble the hat, and let the glue dry.
- Do I need a template?
- A template is not required, but a Turkey Template Printable Free can be helpful, especially if crafting with a group or young children who need guidance with shapes.
- What if I don’t have colored construction paper?
- You can use plain white paper and let kids color it in with markers or crayons. Another option is to use wrapping paper, newspaper, or any paper you have on hand to make it unique.
- Can the hat be worn for a long time?
- For durability, use thicker paper or cardstock for the headband and feathers. This will make the hat sturdy enough for kids to wear throughout the day.
- How do I make sure the feathers stay upright?
- Use extra glue or tape at the base of each feather, or punch holes at the base of the feathers and the back of the headband to secure them with yarn or string.
Conclusion: Share Your Festive Turkey Hat Creations!
Turkey hats are a delightful, simple way to celebrate Thanksgiving and bring smiles to the holiday season.
Encourage kids to experiment with their designs, add creative touches, and make each hat unique. From family gatherings to classroom activities, these turkey hats are sure to be a hit!
We’d love to see your finished turkey hats! Share your creations with family, friends, or on social media to spread the Thanksgiving cheer.
Don’t forget to save this article or share it with others looking for fun, easy Thanksgiving craft ideas.
Happy crafting and happy Thanksgiving

