Meet the Father’s Day Cat
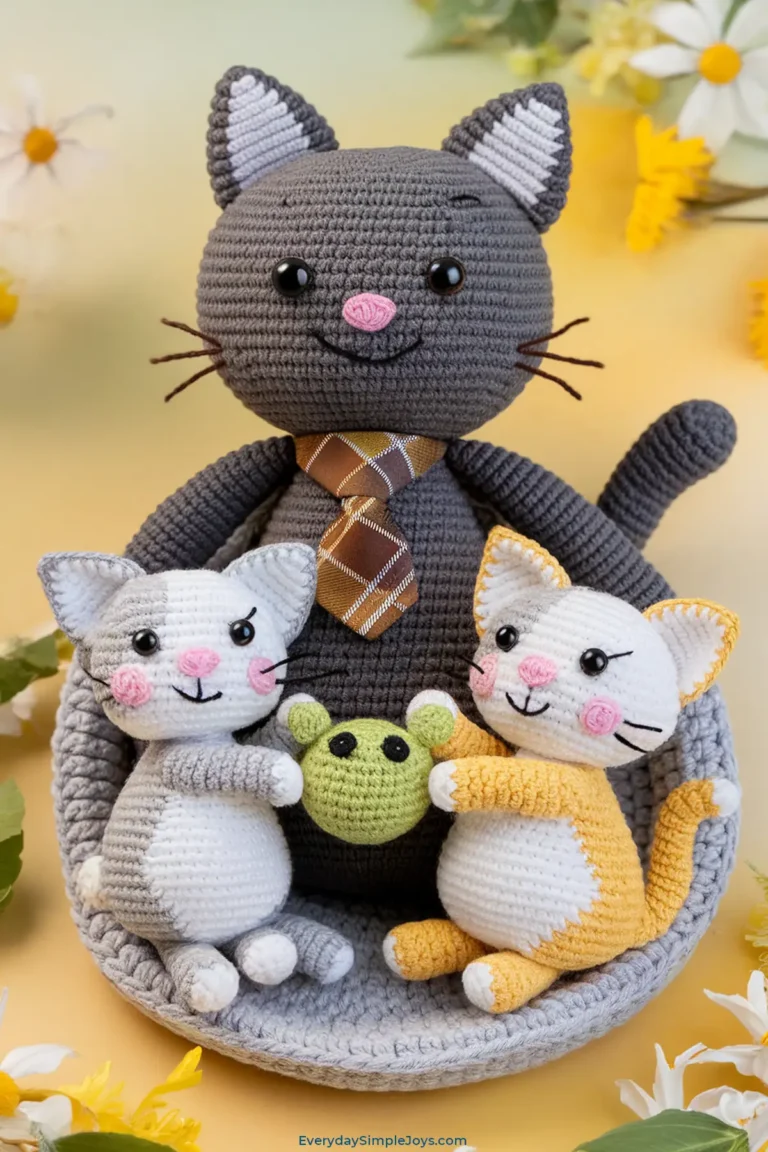
Meet the Father’s Day Cat—a proud papa kitty basking in summer fun. This dapper male wears a plaid tie, lounging with a relaxed grin as his two baby kittens present him with a crocheted catnip mouse. His dark gray coat and laid-back vibe make him the coolest cat dad around.
Personality
This cat’s a chill father figure with a playful edge. He loves napping in the sun, chasing yarn balls, and beaming with pride as his kittens shower him with love. Stitch him up with his little ones, and they’ll bring a hearty purr to your June crafts—a perfect Father’s Day tribute.
What You’ll Make
A 10-inch-tall amigurumi father cat lounging upright, with a dark gray body, brown plaid tie, and an embroidered face (eyes, nose, mouth, whiskers). Two 4-inch-tall baby kittens—one cream, one black—stand beside him, holding a green catnip mouse between them, all crocheted in a cozy family scene.
Stitch Legend
- ch: Chain – Yarn over, pull through loop on hook.
- sc: Single Crochet – Insert hook into stitch, yarn over, pull up a loop, yarn over, pull through both loops.
- dc: Double Crochet – Yarn over, insert hook into stitch, yarn over, pull up a loop, yarn over, pull through 2 loops, yarn over, pull through remaining 2 loops.
- sl st: Slip Stitch – Insert hook into stitch, yarn over, pull through stitch and loop on hook.
- sc2tog: Single Crochet Two Together (decrease) – Insert hook into next stitch, yarn over, pull up a loop, insert hook into next stitch, yarn over, pull up a loop, yarn over, pull through all 3 loops.
- Magic Circle: Adjustable loop—wrap yarn around finger, insert hook, yarn over, pull up a loop, work stitches into ring, pull tail to close.
Materials
- Yarn: Medium weight (4):
- Father body: Dark gray (e.g., Red Heart Super Saver “Charcoal”), ~150 yards.
- Tie: Brown plaid (e.g., Red Heart Super Saver “Coffee” base, with white and tan stripes), ~30 yards.
- Kitten 1 body: Cream (e.g., Red Heart Super Saver “Soft White”), ~50 yards.
- Kitten 2 body: Black (e.g., Red Heart Super Saver “Black”), ~50 yards.
- Catnip mouse: Green (e.g., Red Heart Super Saver “Spring Green”), ~20 yards.
- Eyes, nose, mouth: Black yarn/thread (e.g., DMC Cotton Perle #5) for eyes/mouth; Pink for noses.
- Hook: Size H (5.0 mm) for a soft texture.
- Filling:
- Primary: Polyester fiberfill (~8-12 oz bag).
- Substitutes:
- Cotton batting: Soft, natural, denser.
- Yarn scraps: Finely chopped—eco-friendly.
- Wool roving: Light, fluffy, premium.
- Fabric strips: Washed, shredded clothing—sustainable, heavier.
- Extras:
- Optional: Safety eyes (10-12 mm for father, 6-8 mm for kittens)—for non-child use only.
- Yarn needle, scissors, stitch markers.
- Pipe cleaner (~5” for father’s tail, ~3” each for kittens).
- White embroidery floss or thin yarn (whiskers).
Gauge
16 sc x 18 rows = 4” square. Tight stitches hide filling.
Finished Size
Father: ~10” tall (head to feet), 5” wide. Kittens: ~4” tall each. Mouse: ~2” long.
Notes
- Work in continuous rounds unless specified; mark first stitch.
- Stuff moderately for a relaxed, lounging family.
- US crochet terms used.
Step-by-Step Instructions
Father’s Head
- Magic Circle: With dark gray yarn, form a magic circle. Ch 1, 6 sc into circle, pull tight. (6 sc)
- Increase Round 1: 2 sc in each stitch. (12 sc)
- Increase Round 2: [1 sc, 2 sc in next stitch] 6 times. (18 sc)
- Increase Round 3: [1 sc in next 2 stitches, 2 sc in next stitch] 6 times. (24 sc)
- Increase Round 4: [1 sc in next 3 stitches, 2 sc in next stitch] 6 times. (30 sc)
- Straight Rounds: 1 sc in each stitch for 5 rounds. (30 sc per round)
- Decrease Round 1: [1 sc in next 3 stitches, sc2tog] 6 times. (24 sc)
- Begin Stuffing: Add filling halfway—push into edges.
- Decrease Round 2: [1 sc in next 2 stitches, sc2tog] 6 times. (18 sc)
- Decrease Round 3: [1 sc in next stitch, sc2tog] 6 times. (12 sc)
- Finish Stuffing: Fill fully. Fasten off with 12” tail, weave through front loops, pull tight, knot, hide end.
Father’s Eyes (Choose One Method)
- Placement Note: Add eyes after head is stuffed. Position between rounds 5 and 6, 6 stitches apart (left edge to left edge). Mark if needed.
- Option 1: Yarn Eyes (Safe & Simple):
- Thread needle with black yarn (~12” length).
- Left eye: At round 5, 6 stitches left of center, make a French knot (wrap yarn 3 times around needle, pull through, anchor with a stitch).
- Right eye: Repeat at round 6, 6 stitches right of center.
- Knot inside head, weave in. Result: Small, round eyes, ~¼” wide.
- Option 2: Thread Eyes (Detailed):
- Use black floss (2 strands, ~18” length) and needle.
- Left eye: At round 5, 6 stitches left, outline a ½” oval (2-3 backstitches, up 2 rows, across 2 stitches), fill with 8-10 satin stitches.
- Right eye: Repeat at round 6, 6 stitches right.
- Add white floss dot in top left corner of each for sparkle. Knot inside. Result: Oval, relaxed eyes.
- Option 3: Safety Eyes (Optional):
- Before stuffing (after step 6), insert 10-12 mm safety eyes at rounds 5-6, 6 stitches apart. Secure backs inside.
- Proceed with stuffing. Note: Not safe for kids under 3.
Father’s Nose
- Embroider: With pink yarn/thread, stitch a small triangle at round 8, center (3 stitches wide at base, 2 rows tall, 4-5 satin stitches). Knot inside.
Father’s Mouth
- Embroider: With black yarn/thread, sew a curved line (3 stitches wide) at round 9, below nose, tilting up on the right for a laid-back grin. Knot inside.
Father’s Ears (Make 2)
- Base: With dark gray yarn, ch 5. Sc in 2nd ch from hook, sc in next 3 ch. (4 sc)
- Row 2: Ch 1, turn, sc across. (4 sc)
- Row 3: Ch 1, turn, sc2tog, sc in next 2 stitches. (3 sc)
- Row 4: Ch 1, turn, sc2tog, sc in next stitch. (2 sc) Fasten off, leave 6” tail.
- Attach: Sew ears to head between rounds 3-5, 4 stitches apart, whipstitch base, angle outward.
Father’s Body
- Base Oval: With dark gray yarn, ch 12. Sc in 2nd ch from hook, sc in next 9 ch, 3 sc in last ch. Work opposite side: sc in next 9 ch, 2 sc in last ch. Join with sl st. (24 sc)
- Round 1: Ch 1, [1 sc in next 9 stitches, 2 sc in next stitch, 1 sc, 2 sc in next stitch] twice. Join. (28 sc)
- Straight Rounds: Ch 1, 1 sc in each stitch for 12 rounds, join with sl st. (28 sc per round)
- Stuff: Fill body to ¾ full, keeping it relaxed.
Father’s Legs (Make 4)
- Start: With dark gray yarn, magic circle, ch 1, 6 sc, pull tight. (6 sc)
- Increase Round 1: 2 sc in each stitch. (12 sc)
- Straight Rounds: 1 sc in each stitch for 6 rounds. (12 sc per round)
- Stuff: Fill leg halfway.
- Paw: [1 sc, 2 sc in next stitch] 6 times (18 sc), 1 sc in each stitch for 1 round, [sc2tog] 9 times (9 sc), fasten off with 8” tail, weave through stitches, pull tight.
- Attach: Sew front legs at rounds 28-30 (5 stitches apart), back legs at 33-35 (6 stitches apart), angled for lounging upright.
Father’s Tail
- Start: With dark gray yarn, magic circle, ch 1, 6 sc, pull tight. (6 sc)
- Increase: [1 sc, 2 sc in next stitch] 3 times. (9 sc)
- Straight Rounds: 1 sc in each stitch for 8 rounds. (9 sc per round)
- Stuff: Insert 5” pipe cleaner, add light filling.
- Taper: [1 sc, sc2tog] 3 times (6 sc), fasten off, weave tail through to close.
- Attach: Sew to back center at round 35, curling slightly left.
Father’s Tie
- Base: With brown yarn, ch 10. Sc in 2nd ch from hook, sc in next 8 ch. (9 sc)
- Rows 2-6: Ch 1, turn, sc across. (9 sc per row)
- Taper: Ch 1, turn, sc2tog, sc in next 5 stitches, sc2tog (7 sc); next row: ch 1, turn, sc2tog, sc in next 3 stitches, sc2tog (5 sc). Fasten off.
- Plaid: With white yarn, embroider 2 vertical lines (2 stitches apart) and 2 horizontal lines (2 rows apart) using backstitch. Repeat with tan yarn, offset slightly.
- Attach: Sew top of tie to body at round 26, center, knot loosely at bottom.
Kitten Heads (Make 2 – One Cream, One Black)
- Magic Circle: With cream or black yarn, form a magic circle. Ch 1, 6 sc into circle, pull tight. (6 sc)
- Increase Round 1: 2 sc in each stitch. (12 sc)
- Increase Round 2: [1 sc, 2 sc in next stitch] 6 times. (18 sc)
- Straight Rounds: 1 sc in each stitch for 3 rounds. (18 sc per round)
- Decrease Round 1: [1 sc in next stitch, sc2tog] 6 times. (12 sc)
- Stuff: Fill halfway, then fully.
- Close: [Sc2tog] 6 times (6 sc), fasten off with 8” tail, weave through stitches, pull tight.
Kitten Eyes (Choose One Method per Kitten)
- Placement Note: Add eyes after head is stuffed. Position between rounds 3 and 4, 4 stitches apart.
- Option 1: Yarn Eyes (Safe & Simple):
- Thread needle with black yarn (~10” length).
- Left eye: At round 3, 4 stitches left of center, make a French knot (wrap yarn 3 times).
- Right eye: Repeat at round 4, 4 stitches right.
- Knot inside, weave in. Result: Tiny eyes, ~¼” wide.
- Option 3: Safety Eyes (Optional):
- Before stuffing (after step 47), insert 6-8 mm safety eyes at rounds 3-4, 4 stitches apart.
- Proceed with stuffing. Note: Not safe for kids under 3.
Kitten Noses
- Embroider: With pink yarn/thread, stitch a tiny triangle at round 5, center (2 stitches wide, 1 row tall). Knot inside.
Kitten Mouths
- Embroider: With black yarn/thread, sew a small “u” (2 stitches wide) at round 6, below nose. Knot inside.
Kitten Ears (Make 4 – Two Cream, Two Black)
- Base: With cream or black yarn, ch 4. Sc in 2nd ch from hook, sc in next 2 ch. (3 sc)
- Row 2: Ch 1, turn, sc2tog, sc in next stitch. (2 sc) Fasten off, leave tail.
- Attach: Sew ears to head between rounds 2-3, 3 stitches apart, whipstitch base.
Kitten Bodies (Make 2)
- Magic Circle: With cream or black yarn, form a magic circle. Ch 1, 6 sc into circle, pull tight. (6 sc)
- Increase Round 1: 2 sc in each stitch. (12 sc)
- Increase Round 2: [1 sc, 2 sc in next stitch] 6 times. (18 sc)
- Straight Rounds: 1 sc in each stitch for 5 rounds. (18 sc per round)
- Stuff: Fill to ¾ full.
- Close: [1 sc in next stitch, sc2tog] 6 times (12 sc), fasten off with 8” tail, weave through stitches, pull tight.
Kitten Legs (Make 8)
- Start: With cream or black yarn, magic circle, ch 1, 6 sc, pull tight. (6 sc)
- Straight Rounds: 1 sc in each stitch for 4 rounds. (6 sc per round)
- Stuff: Fill lightly.
- Close: [Sc2tog] 3 times (3 sc), fasten off, weave through stitches, pull tight.
- Attach: Sew 4 legs to each body—front at rounds 60-61, back at 63-64, angled for standing.
Kitten Tails (Make 2)
- Start: With cream or black yarn, magic circle, ch 1, 6 sc, pull tight. (6 sc)
- Straight Rounds: 1 sc in each stitch for 5 rounds. (6 sc per round)
- Stuff: Insert 3” pipe cleaner, add light filling.
- Close: [Sc2tog] 3 times (3 sc), fasten off, weave through stitches.
- Attach: Sew to back center at round 64, curling slightly.
Catnip Mouse
- Base: With green yarn, magic circle, ch 1, 6 sc, pull tight. (6 sc)
- Increase Round 1: 2 sc in each stitch. (12 sc)
- Increase Round 2: [1 sc, 2 sc in next stitch] 6 times. (18 sc)
- Straight Rounds: 1 sc in each stitch for 3 rounds. (18 sc per round)
- Stuff: Fill with fiberfill (or add catnip inside).
- Decrease: [1 sc, sc2tog] 6 times (12 sc), [sc2tog] 6 times (6 sc), fasten off, weave through stitches, pull tight.
- Ears: With green yarn, ch 3, sc in 2nd ch, sc in next ch (2 sc), fasten off, sew to top (round 77), 2 stitches apart.
- Tail: Ch 6, fasten off, sew to back end.
- Attach: Sew mouse between kittens’ front paws, angled toward father.
Assembly
- Father’s Head to Body: Sew head to body at round 25, straight—use ladder stitch.
- Kitten Heads to Bodies: Sew each head to body at round 60, tilting slightly up.
- Family Pose: Sew father’s base to a flat surface (optional base). Position cream kitten on his left, black on his right, mouse held between them facing father.
Seasonal Touch
Your Father’s Day Cat family is ready to celebrate! With his plaid tie and the kittens’ catnip mouse gift, he’s the coolest dad for June. Set them on a shelf with a bright incomeing sunbeam, and let their playful love shine through Father’s Day.

