Feeling stuck indoors during those cold winter days?
Keep your preschoolers excited and engaged with these clever and creative Winter Crafts For Kids that require minimal prep but deliver maximum fun!
Whether you’re decorating your classroom with a festive Winter Window Display, learning through Weather Experiments Kindergarten, or crafting timeless treasures like a Snowman Craft or Pipe Cleaner Snowflakes, this DIY list will have you covered.
Why You’ll Love This DIY Project List?
It’s packed with practical and fun ideas that make winter sparkle—easy enough for little hands, but big on creativity!
- Quick, simple setups make these Crafts For Kids accessible for busy parents and teachers alike.
- Uniquely combines creativity and education, with options like exploring science through the Snowstorm In A Jar Experiment.
- Fun and satisfying projects—like making Holiday Crafts For Kids or a festive Marshmallow Snowman—will leave kids smiling from ear to ear.
- Don’t miss this chance to transform winter days into magical moments brimming with creativity and learning.
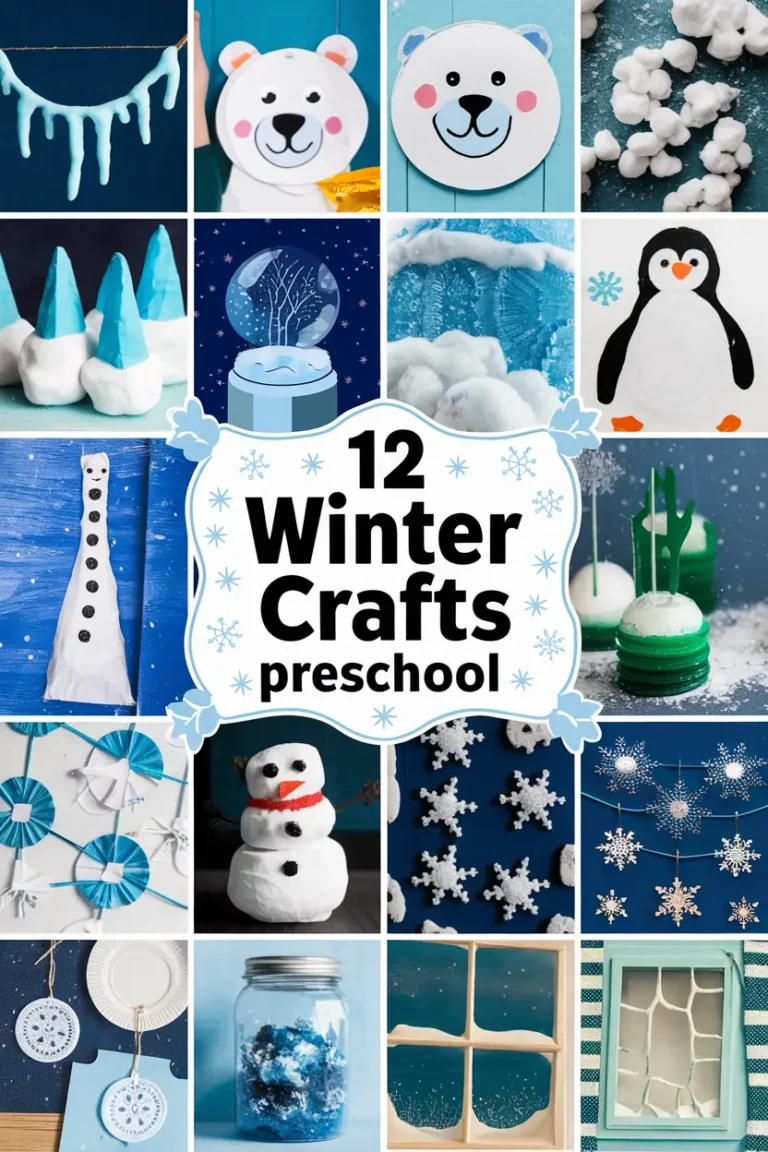
Icicle Garland with Foil and String
Transform your space into a winter wonderland with this simple and eye-catching icicle garland! Made from aluminum foil and string, this craft is perfect for kids to explore textures while creating shimmering icicles that look just like the real thing. Not only is this an easy and mess-free craft for kids, but it’s also a fantastic addition to winter camp ideas for kids or a preschool classroom’s winter window display. Kids will love seeing their artwork hanging proudly as part of your seasonal décor!
Pros/Features
- Easy and safe for preschoolers with simple materials.
- Great for fine motor skill development as kids twist and shape the foil.
- Perfect for winter crafts for kids or Decoration Creche ideas.
- Minimal cleanup and no messy paints or glue required.
DIY Instructions
Materials Needed
- Aluminum foil
- String or twine
- Scissors
- Optional: Glitter glue for extra sparkle
Step-by-Step Process
- Cut aluminum foil into long rectangular strips. The length depends on how long you want your icicles to be.
- Gently twist the foil strips to create a spiral icicle shape. Encourage kids to make some thick and some thin for variety.
- Attach the icicles to a long piece of string or twine by simply wrapping the tops of the foil around the string.
- If desired, use glitter glue to add a frosty sparkle to the icicles. Allow to dry before hanging.
Extra Tips
For added winter vibes, hang the icicle garland near fairy lights to make the foil shimmer beautifully. This craft is versatile and can also be used for holiday crafts for kids to decorate a Christmas tree or a preschool Christmas celebration. If working with toddlers, pre-cut the foil to make it safer and easier for little hands to twist.
Puffy Paint Polar Bear Masks
Get ready for some winter-themed fun with these adorable puffy paint polar bear masks! This craft combines sensory play with creativity as kids use homemade puffy paint to create fluffy, textured masks. Perfect for preschoolers, this activity doubles as a fun art project and imaginative play idea. Whether for a daycare crafts session or winter camp ideas for kids, these masks are sure to delight your little ones!
Pros/Features
- Encourages sensory exploration with soft, squishy puffy paint.
- Combines art and play for a well-rounded preschool activity.
- Great for a winter preschool theme or January crafts project.
- Customizable with different decorations like glitter or pom-poms.
DIY Instructions
Materials Needed
- Paper plates
- Shaving cream
- Elmer’s glue
- Paintbrushes
- Black construction paper
- Scissors
- Elastic string
Step-by-Step Process
- Mix equal parts shaving cream and Elmer’s glue to create puffy paint. Stir until smooth and fluffy.
- Cut out two eye holes in the paper plate to turn it into a mask base.
- Have kids paint the plate with the puffy paint, covering it entirely to mimic a polar bear’s fur.
- Cut out a small black circle from the construction paper to make a nose. Glue it onto the center of the mask.
- Attach an elastic string to the sides of the plate, ensuring it fits snugly around the child’s head.
Extra Tips
Let the puffy paint dry for a few hours before using the masks for play. For added fun, incorporate this craft into a winter storytime or play about polar animals. Kids can wear their masks while learning about arctic wildlife or during a weather-related science experiment like Weather in a Jar or Snowstorm in a Jar Experiment!
Magical Winter Snowstorm Globes
Bring the magic of a snowstorm indoors with these DIY winter snowstorm globes! This craft combines creativity with a touch of science, making it ideal for weather-related science experiments or a January science experiments for kids session. With just a few simple materials, kids can create their own mesmerizing snowy scene in a jar. It’s a wonderful blend of art, science, and holiday crafts for kids.
Pros/Features
- Encourages scientific curiosity while being fun to make.
- Reusable and perfect as a winter window display or preschool Christmas gift.
- Combines sensory and visual stimulation, keeping kids engaged.
- Easy to create with readily available materials.
DIY Instructions
Materials Needed
- Small clear jars with lids
- Baby oil or vegetable oil
- White glitter
- Small winter-themed figurines (e.g., snowmen or pine trees)
- Hot glue gun
- Optional: Blue food coloring
Step-by-Step Process
- Glue the winter-themed figurines securely to the inside of the jar lid using a hot glue gun. Let it dry completely.
- Fill the jar almost to the top with baby oil or vegetable oil. If you’d like a tinted effect, add one or two drops of blue food coloring and stir gently.
- Sprinkle in some white glitter to mimic snow. You can also add small iridescent sequins for extra sparkle.
- Screw on the lid tightly, ensuring the figurines are submerged. Flip the jar upside down to watch the snowstorm swirl inside!
Extra Tips
For younger kids, pre-glue the figurines to the lids to make it a safer activity. These snowstorm globes make great gifts for family members and can also be used to teach weather experiments kindergarten kids would love, like how precipitation works. Use a variety of figurines to let kids personalize their globes!
Cotton Ball Arctic Landscape Scenes
Creating a beautiful Arctic landscape using cotton balls is an engaging and creative activity for kids. This craft allows preschoolers to explore textures while learning about wintry settings. It’s a fun way to combine art with a bit of geography, perfect for a cozy crafting session during the colder months. The result is a fluffy, snowy masterpiece that’s sure to stand out on a winter-themed bulletin board or Winter Window Display.
Pros/Features
- Encourages creativity by letting kids design their own Arctic scene.
- Uses simple, inexpensive materials, making it ideal for Daycare Crafts.
- Great for teaching about winter habitats and animals in a hands-on way.
- Perfect for Preschool Christmas Crafts or other Winter Preschool activities.
DIY Instructions
Materials Needed
- Cotton balls
- Blue construction paper or cardstock
- Glue stick or school glue
- Craft foam or paper cutouts of Arctic animals (like polar bears or penguins)
- Silver glitter (optional for snow effect)
- Markers or crayons (optional for detailing)
Step-by-Step Process
- Start by giving each child a sheet of blue construction paper to serve as the Arctic sky.
- Encourage them to glue cotton balls across the bottom of the page to create a snowy ground. They can stretch some cotton balls for a fluffier look.
- Next, have children add Arctic animal cutouts on top of the snow. They can glue polar bears, penguins, or even igloos for a true winter vibe.
- Optional: Sprinkle silver glitter over the cotton balls to mimic sparkling snow.
- Let the artwork dry completely before displaying in the classroom or at home.
Extra Tips
Encourage kids to use their imagination by adding details like snowflakes or drawing auroras in the sky with crayons. This activity pairs wonderfully with a winter-themed storytime or a mini Arctic lesson. For a sturdier display, use a paper plate as the base instead of paper.
Sparkly Penguin Handprint Art
Handprint art is always a hit with kids, and this sparkly penguin craft adds a wintery twist! This activity is great for keeping little hands busy while creating a keepsake for parents during the holiday season. It combines painting and glitter for a craft easy and fun enough to engage kids of all ages. Perfect for Preschool Christmas Crafts or Holiday Crafts For Kids!
Pros/Features
- Transforms handprints into adorable penguins, making it a memorable keepsake.
- Great for improving fine motor skills and sparking creativity.
- Adds a festive sparkle, perfect for Winter Crafts For Kids.
- Simple setup, using materials already found in most classrooms or homes.
DIY Instructions
Materials Needed
- Black washable paint
- White and orange construction paper
- Silver glitter
- Googly eyes
- Glue stick or school glue
- Paintbrush
Step-by-Step Process
- Paint the child’s hand (palm and fingers) with black washable paint. Make sure to leave the thumb unpainted for a better penguin shape.
- Press the hand onto a white sheet of paper and let it dry. The fingers will become the penguin’s wings, and the palm will form its body.
- Cut out a small oval of white construction paper for the penguin’s belly and glue it onto the palm area of the handprint.
- Add googly eyes near the top, and cut a small orange triangle for the beak. Glue both onto the penguin’s face.
- Optional: Add silver glitter around the penguin to mimic a frosty winter setting.
Extra Tips
For added fun, let kids create a whole penguin family using different handprints! Use a paper plate as the background to make the craft sturdier and easier to hang as part of a Winter Window Display.
Winter Wonderland Sensory Bottles
Sensory bottles are the perfect blend of calming and educational activities for preschoolers. These winter-themed bottles are great for exploring textures, colors, and movement, while keeping little ones entertained. Add some sparkle and creativity to your Winter Camp Ideas For Kids or classroom science corner with this activity!
Pros/Features
- Encourages sensory exploration and curiosity for young children.
- Easy to customize with different materials to fit a Winter Crafts For Kids theme.
- Durable and reusable for long-lasting fun.
- Perfect for introducing Weather Ideas For Preschool in a hands-on way.
DIY Instructions
Materials Needed
- Clear plastic bottles with lids
- Water or clear baby oil
- Silver glitter
- Small snowflake confetti or beads
- Blue food coloring (optional)
- Hot glue gun (for sealing bottles)
Step-by-Step Process
- Fill each plastic bottle about two-thirds full with water or clear baby oil. Add a few drops of blue food coloring if desired.
- Sprinkle in silver glitter and small snowflake confetti to create a sparkling winter scene.
- Screw the lid back on tightly and seal it with hot glue to prevent leaks.
- Shake the bottle gently to watch the glitter and confetti swirl like a snowstorm.
Extra Tips
To turn this into a science activity, discuss how the glitter moves through the liquid and compare the effects of using water versus oil. These sensory bottles pair wonderfully with a Snowstorm In A Jar Experiment or similar Weather Related Science Experiments for a full winter-themed learning experience.
Paper Plate Spinning Winter Hat Craft
This Paper Plate Spinning Winter Hat Craft is a delightful activity that preschoolers will absolutely adore! It showcases creativity, movement, and winter fun all in one. Kids can personalize their winter hats with bright colors and patterns, and the spinning feature adds an interactive twist that makes this project stand out. It’s a fantastic craft idea for daycare settings, winter camp, or just a cozy afternoon activity at home.
Pros/Features
- Combines art and motion for added engagement.
- Simple materials make it budget-friendly and accessible.
- Encourages creativity as kids can design their own patterns.
- Perfect for winter preschool themes and classroom displays.
DIY Instructions
Materials Needed
- Paper plates
- Scissors
- Paints, markers, or crayons
- Glue stick
- Glitter, stickers, or pom-poms for decoration
- Brass fasteners
Step-by-Step Process
- Take a paper plate and cut out the center, leaving the rim intact. This will be the base of your spinning craft.
- On another paper plate, draw and cut out a winter hat shape that fits within the rim of the first plate.
- Decorate the winter hat using paints, markers, stickers, or pom-poms. Let the kids have fun creating their unique designs!
- Once the decorations are done and dried, attach the winter hat to the rim of the first paper plate using a brass fastener. This will allow the hat to spin freely.
- Test the spinning mechanism and adjust if needed. You’re ready to display your masterpiece!
Extra Tips
To make this craft even more exciting, use glow-in-the-dark or metallic paints for a magical touch. Encourage kids to create matching designs for a winter-themed classroom or window display. This activity also pairs wonderfully with weather-related science experiments or winter camp ideas for kids for an educational twist.
Marshmallow Snowman Garland
Who doesn’t love a snowman craft, especially one made from marshmallows? This Marshmallow Snowman Garland is as adorable as it is easy to make, making it a favorite winter craft for kids. Preschoolers will love stringing together these squishy snowmen to create a fun winter decoration for the classroom or home. Plus, it’s a craft you can snack on while working!
Pros/Features
- Edible materials make it a fun and tasty craft.
- Ideal for fine motor skill development in young children.
- Can double as a festive holiday decoration.
- Perfect for preschool Christmas crafts or a winter preschool theme.
DIY Instructions
Materials Needed
- Large marshmallows
- String or yarn
- Black and orange markers
- Mini chocolate chips (optional)
- Sewing needle (plastic needles work well for kids)
Step-by-Step Process
- Thread a string or yarn through the needle. Younger kids might need help with this step.
- Gently push the needle through the center of each marshmallow to string them together. Space them out evenly along the string.
- Using black and orange markers, draw snowman faces on the marshmallows. Mini chocolate chips can be used to add buttons or other details.
- Continue adding marshmallows and decorating until you have a full garland.
- Hang your Marshmallow Snowman Garland along windows, walls, or doorways for a festive winter touch.
Extra Tips
For added durability, consider using foam marshmallows instead of real ones. You can also spray the marshmallows with a clear sealant if you’d like to preserve the garland for longer display. This craft pairs well with holiday crafts for kids or as a decoration creche idea during Christmastime.
Pipe Cleaner Snowflakes with Glitter Accents
Pipe Cleaner Snowflakes are a classic winter craft that never goes out of style, and adding glitter accents makes them even more magical! These sparkly creations are perfect for preschoolers to make and hang as decorations. They’re easy, fun, and a fantastic way to explore symmetry and creativity during winter preschool activities or daycare crafts.
Pros/Features
- Simple and affordable materials.
- Great for fine motor skill development.
- Can be used as ornaments or winter window display decorations.
- Perfect for group activities or individual crafting sessions.
DIY Instructions
Materials Needed
- White or silver pipe cleaners
- Scissors
- Glue
- Glitter
- String or ribbon (optional, for hanging)
Step-by-Step Process
- Take three pipe cleaners and twist them together at the center to form a star-like shape with six arms.
- Cut smaller pieces of pipe cleaner to create branches for each arm. Twist these smaller pieces onto the main arms to make your snowflake more intricate.
- Apply glue along the pipe cleaner arms and sprinkle glitter generously over the surface. Shake off the excess glitter and let it dry.
- If you want to hang the snowflake, attach a string or ribbon loop to one arm.
- Repeat the process to create multiple snowflakes for a dazzling winter display.
Extra Tips
Use colored pipe cleaners or mix glitter colors for unique designs. You can also experiment with different snowflake shapes, teaching kids about the uniqueness of real snowflakes. These are perfect for science weather activities preschool classrooms might explore during a winter theme!
Weather in a Jar: Frosty Precipitation Experiment
This fun, hands-on activity is perfect for introducing weather-related science experiments to curious preschoolers. The Weather in a Jar experiment demonstrates how precipitation forms, making it a great tie-in with winter weather themes. Kids will love watching their “snowstorm” or “rain” form right before their eyes, making it both educational and magical.
Pros/Features
- Perfect for teaching weather concepts in a visual and engaging way.
- Simple and safe materials make it ideal for preschool and daycare settings.
- Can be adapted to simulate rain, snow, or frost, depending on your theme.
DIY Instructions
Materials Needed
- A clear glass jar
- Shaving cream
- Water
- Food coloring
- A pipette or dropper
Step-by-Step Process
- Fill the glass jar about three-quarters full with water.
- Spray a thick layer of shaving cream on top of the water to represent clouds.
- In a separate small container, mix a few drops of food coloring with water to create your “rain” or “snow.”
- Use a pipette or dropper to slowly add the colored water onto the shaving cream layer.
- Watch as the “precipitation” falls through the shaving cream into the water below, simulating a weather event.
Extra Tips
To make this activity even more engaging, talk about the science behind clouds and precipitation while the experiment unfolds. For a winter twist, use blue or white food coloring and call it a “snowstorm in a jar experiment.” You can also let toddlers and preschoolers experiment with different amounts of coloring to see how it changes the “weather.” This is a must-try for weather ideas for preschool and a hit at January science experiments for kids!
Popsicle Stick Winter Window Frames
This craft combines creativity and functionality by letting kids make their own winter-themed window displays. Whether it’s snowflakes, snowy trees, or frosty landscapes, these popsicle stick frames are a wonderful way to showcase their artwork. It’s an easy, mess-free craft for kids that also doubles as a festive holiday decoration.
Pros/Features
- Encourages creativity and self-expression for kids.
- Great for winter preschool or daycare crafts.
- Lightweight and easy to hang, making them perfect for a winter window display or decoration creche.
DIY Instructions
Materials Needed
- Popsicle sticks
- Glue
- Paint (white, blue, or sparkly for a snowy effect)
- Winter-themed stickers or paper cutouts
- Ribbon or string for hanging
Step-by-Step Process
- Glue four popsicle sticks together to form a square frame.
- Once the glue dries, paint the popsicle sticks in wintery colors like white or blue. Add glitter for extra sparkle.
- Decorate the frame with winter-themed stickers, cutouts, or even small pipe cleaner snowflakes.
- Attach a ribbon or string to the top of the frame for hanging.
- Let kids draw or paint a winter scene on a piece of paper to display within their handmade frame.
Extra Tips
For an added educational twist, discuss the winter season and weather while creating the frames. Ask kids to describe what they see out their windows in winter and incorporate these observations into their art. This activity is fantastic for holiday crafts for kids and makes adorable preschool Christmas crafts to send home as keepsakes.
Snowy Day Paper Plate Dioramas
Transform an ordinary paper plate into a mini winter wonderland with this delightful craft. Snowy day paper plate dioramas let kids explore their imagination by creating three-dimensional winter scenes. This craft for kids is perfect for sparking creativity and teaching spatial awareness in a fun, hands-on way.
Pros/Features
- An excellent way to reuse and repurpose paper plates for eco-friendly crafting.
- Encourages storytelling as kids design their unique winter scenes.
- Perfect for winter camp ideas for kids, combining creativity and play.
DIY Instructions
Materials Needed
- Paper plates
- Cotton balls or fake snow
- Craft paper (for trees, snowmen, etc.)
- Glue and scissors
- Markers or crayons
Step-by-Step Process
- Cut one paper plate in half to serve as the background for your diorama.
- Glue the half-plate vertically onto another full plate to create a standing scene.
- Decorate the back plate with a winter sky, drawing snowflakes or clouds with markers or crayons.
- Use craft paper to cut out shapes like trees, snowmen, or animals and glue them onto the base plate.
- Spread cotton balls or fake snow at the bottom to complete the snowy look.
Extra Tips
Encourage kids to add personal touches like their favorite winter animals or activities. Incorporate small figurines or stickers for added dimension and fun. Snowy dioramas also make great display pieces for a preschool Christmas or winter preschool classroom setup!
FAQ
How do I make Icicle Garland with Foil and String?
The Icicle Garland is a simple and fun craft for kids! Cut aluminum foil into strips and twist them to resemble icicles. Attach the foil icicles to a string, and you’ve got yourself a sparkly winter-themed decoration that’s perfect for preschool classrooms or home winter window displays.
What materials do I need for Puffy Paint Polar Bear Masks?
To make these adorable polar bear masks, you’ll need a paper plate, homemade puffy paint (a mix of shaving cream and white glue), cotton balls, a stick for holding the mask, and markers. Kids will love creating their own textured polar bear faces!
How can I create Magical Winter Snowstorm Globes?
Magical Winter Snowstorm Globes are a hit for winter crafts for kids! Use a jar filled with water, glitter, and glycerin (to make the glitter float slower). Add a small waterproof figurine and seal the lid tightly for your very own snowstorm in a jar experiment.
What goes into making Cotton Ball Arctic Landscape Scenes?
This preschool craft is easy and fun! Use cotton balls to create snow-covered scenes on construction paper. Add details like penguins, igloos, or arctic animals by cutting shapes from colored paper or using stickers.
How do I paint Sparkly Penguin Handprint Art?
For this holiday craft for kids, paint a child’s hand with black paint for the wings, white for the belly, and orange for the feet. Stamp the handprint onto paper and decorate it with sparkles. Draw or paint a penguin face at the top to complete the look.
What are Winter Wonderland Sensory Bottles, and how do I make one?
Fill clear plastic bottles with water, glitter, and small winter-themed items like foam snowflakes or beads. These sensory bottles offer a calming activity and can be customized easily depending on your theme.
How does the Paper Plate Spinning Winter Hat Craft work?
Using a paper plate and craft supplies, create a winter hat design with markers, stickers, or other embellishments. Cut and attach a spinner mechanism to make the hat rotate—a wonderful toy and decoration!
How do I assemble a Marshmallow Snowman Garland?
Thread marshmallows onto a string to make cute snowmen. Add details like faces, scarves, and arms using permanent markers or pipe cleaners. It’s a mess-free craft for kids and a great decoration creche option.
How do I use Pipe Cleaner Snowflakes with Glitter Accents?
Bend pipe cleaners into snowflake shapes and decorate them with glitter and glue for a sparkly effect. These are perfect for hanging as ornaments or creating a winter preschool classroom aesthetic.
What is Weather in a Jar: Frosty Precipitation Experiment?
This weather-related science experiment uses a jar, hot water, ice, and hairspray to simulate precipitation. It’s a fascinating activity for kids to watch frost forms inside the jar, making it ideal for weather ideas for preschool or January science experiments for kids.
How do I craft Popsicle Stick Winter Window Frames?
Glue popsicle sticks together to create a window frame shape. Use tissue paper or cellophane to mimic frosty panes, then decorate the frame with snowflakes and glitter for a cozy winter window display.
What’s the process for making Snowy Day Paper Plate Dioramas?
Cut and fold a paper plate to create a standing 3D scene. Glue cotton balls, paper cutouts of trees or snowmen, and other winter decorations onto the plate to bring your snowy day landscape to life.
Conclusion
Winter crafts for preschool children can be a delightful way to embrace the season while encouraging creativity, sensory exploration, and fun. From the magical charm of Snowstorm in a Jar experiments to classic Paper Plate crafts like Spinning Winter Hats, these activities are designed to keep young hands busy and imaginations alive.
The variety—ranging from Marshmallow Snowman Garlands to Sparkly Penguin Handprint Art—offers something for every taste and interest, ensuring an engaging experience for toddlers, daycare groups, or preschool classrooms.
Whether you’re looking for easy Christmas crafts for toddlers, winter camp ideas for kids, or January crafts to brighten chilly days, these projects are all about celebrating the magic of the season.
Plus, hands-on tasks like Pipe Cleaner Snowflakes and Weather Experiments for Kindergarten add an educational element, blending science and art seamlessly.
Save this article for your next winter camp or classroom crafting session, and share it with other parents, teachers, or childcare providers who might enjoy these ideas.
What’s your favorite winter craft? Let us know in the comments below! Happy crafting!

