Meet the Beekeeper Cat
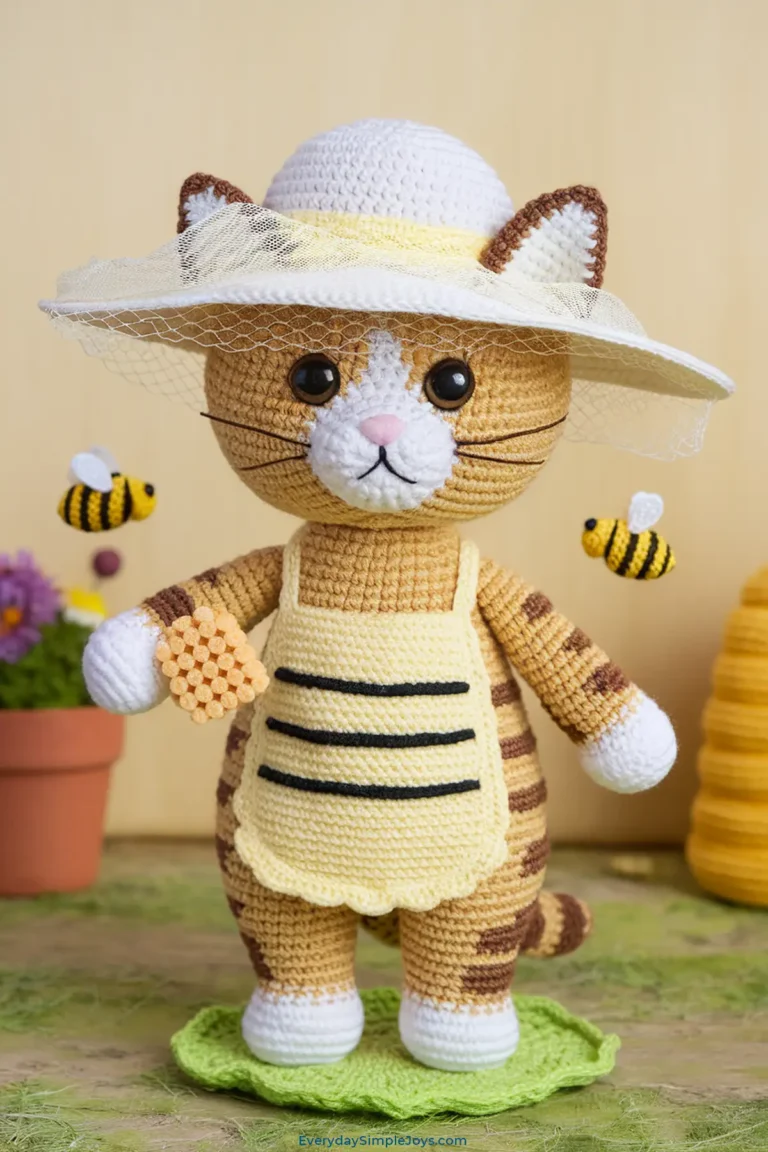
Introducing the Beekeeper Cat, a busy male kitty buzzing with springtime energy. He’s decked out in a white beekeeper hat with a net, a yellow-and-black striped apron, and holds a tiny honeycomb in his paw. His golden-brown tabby coat shines like honey, and a few crocheted bees hover around him, making him the cutest guardian of the hive.
Personality
This cat’s a hardworking little fella with a sweet streak. He’s all about tending his yarn bees, buzzing around with purpose, and napping in the sun after a job well done. Stitch him up, and he’ll bring a delightful hum to your April and May crafts—a purr-fect pollinator pal.
What You’ll Make
A 12-inch-long amigurumi cat standing upright with a busy stance, featuring a golden-brown tabby body, white beekeeper hat, yellow-and-black apron, and a tan honeycomb. He’s got tabby ears, four legs with brown paws, a striped tail, and an embroidered face (eyes, nose, mouth, whiskers). Three tiny crocheted bees add a playful buzz around him.
Stitch Legend
- ch: Chain – Yarn over, pull through loop on hook.
- sc: Single Crochet – Insert hook into stitch, yarn over, pull up a loop, yarn over, pull through both loops.
- dc: Double Crochet – Yarn over, insert hook into stitch, yarn over, pull up a loop, yarn over, pull through 2 loops, yarn over, pull through remaining 2 loops.
- sl st: Slip Stitch – Insert hook into stitch, yarn over, pull through stitch and loop on hook.
- sc2tog: Single Crochet Two Together (decrease) – Insert hook into next stitch, yarn over, pull up a loop, insert hook into next stitch, yarn over, pull up a loop, yarn over, pull through all 3 loops.
- Magic Circle: Adjustable loop—wrap yarn around finger, insert hook, yarn over, pull up a loop, work stitches into ring, pull tail to close.
Materials
- Yarn: Medium weight (4):
- Main body: Golden-brown (e.g., Red Heart Super Saver “Cafe Latte”), ~200 yards.
- Paws: Brown (e.g., Red Heart Super Saver “Coffee”), ~50 yards.
- Beekeeper hat: White (e.g., Red Heart Super Saver “Soft White”), ~50 yards.
- Apron: Yellow (e.g., Red Heart Super Saver “Bright Yellow”), ~50 yards.
- Apron stripes and bees: Black (e.g., Red Heart Super Saver “Black”), ~20 yards.
- Honeycomb: Tan (e.g., Red Heart Super Saver “Buff”), ~20 yards.
- Face: Black yarn/thread (e.g., DMC Cotton Perle #5) for eyes/mouth, brown for nose.
- Bee wings: White scraps, ~10 yards.
- Hook: Size H (5.0 mm) for a firm texture.
- Filling:
- Primary: Polyester fiberfill (~8-12 oz bag).
- Substitutes:
- Cotton batting: Soft, natural, denser.
- Yarn scraps: Finely chopped—eco-friendly.
- Wool roving: Light, fluffy, premium.
- Fabric strips: Washed, shredded clothing—sustainable, heavier.
- Extras:
- Optional: Safety eyes (10-12 mm)—for non-child use only.
- Yarn needle, scissors, stitch markers.
- Pipe cleaner (~5” for tail).
- White embroidery floss or thin yarn (whiskers).
Gauge
16 sc x 18 rows = 4” square. Tight stitches hide filling.
Finished Size
~12” long (head to tail), 5” wide (with legs), 6” tall standing.
Notes
- Work in continuous rounds unless specified; mark first stitch.
- Stuff firmly for a sturdy, busy stance.
- US crochet terms used.
Step-by-Step Instructions
Head
- Magic Circle: With golden-brown yarn, form a magic circle. Ch 1, 6 sc into circle, pull tight. (6 sc)
- Increase Round 1: 2 sc in each stitch. (12 sc)
- Increase Round 2: [1 sc, 2 sc in next stitch] 6 times. (18 sc)
- Increase Round 3: [1 sc in next 2 stitches, 2 sc in next stitch] 6 times. (24 sc)
- Increase Round 4: [1 sc in next 3 stitches, 2 sc in next stitch] 6 times. (30 sc)
- Increase Round 5: [1 sc in next 4 stitches, 2 sc in next stitch] 6 times. (36 sc)
- Straight Rounds: 1 sc in each stitch for 6 rounds. (36 sc per round)
- Decrease Round 1: [1 sc in next 4 stitches, sc2tog] 6 times. (30 sc)
- Decrease Round 2: [1 sc in next 3 stitches, sc2tog] 6 times. (24 sc)
- Begin Stuffing: Add filling halfway—push into edges.
- Decrease Round 3: [1 sc in next 2 stitches, sc2tog] 6 times. (18 sc)
- Decrease Round 4: [1 sc in next stitch, sc2tog] 6 times. (12 sc)
- Finish Stuffing: Fill firmly. Fasten off with 12” tail, weave through front loops, pull tight, knot, hide end.
Eyes (Choose One Method)
- Placement Note: Add eyes after head is stuffed. Position between rounds 9 and 10, 6 stitches apart (left edge to left edge). Mark if needed.
- Option 1: Yarn Eyes (Safe & Simple):
- Thread needle with black yarn (~12” length).
- Left eye: At round 9, 6 stitches left of center, make a French knot (wrap yarn 3 times around needle, pull through, anchor with a stitch).
- Right eye: Repeat at round 10, 6 stitches right of center.
- Knot inside head, weave in. Result: Small, round eyes, ~¼” wide.
- Option 2: Thread Eyes (Detailed):
- Use black floss (2 strands, ~18” length) and needle.
- Left eye: At round 9, 6 stitches left, outline a ½” oval (2-3 backstitches, up 2 rows, across 2 stitches), fill with 8-10 satin stitches.
- Right eye: Repeat at round 10, 6 stitches right.
- Add white floss dot in top left corner of each for sparkle. Knot inside. Result: Oval, busy eyes.
- Option 3: Safety Eyes (Optional):
- Before stuffing (after step 7), insert 10-12 mm safety eyes at rounds 9-10, 6 stitches apart. Secure backs inside.
- Proceed with stuffing. Note: Not safe for kids under 3.
Nose
- Embroider: With brown yarn/thread, stitch a small triangle at round 12, center (3 stitches wide at base, 2 rows tall, 4-5 satin stitches). Knot inside.
Mouth
- Embroider: With black yarn/thread, sew a straight line (3 stitches wide) at round 13, below nose, with a slight upward curve for a content look. Knot inside.
Ears (Make 2)
- Base: With golden-brown yarn, ch 6. Sc in 2nd ch from hook, sc in next 4 ch. (5 sc)
- Row 2: Ch 1, turn, sc across. (5 sc)
- Row 3: Ch 1, turn, sc2tog, sc in next 3 stitches. (4 sc)
- Row 4: Ch 1, turn, sc2tog, sc in next 2 stitches. (3 sc)
- Row 5: Ch 1, turn, sc2tog, sc in next stitch. (2 sc) Fasten off, leave 6” tail.
- Attach: Sew ears to head between rounds 3-6, 5 stitches apart, whipstitch base, angle outward.
Body
- Base Oval: With golden-brown yarn, ch 12. Sc in 2nd ch from hook, sc in next 9 ch, 3 sc in last ch. Work opposite side: sc in next 9 ch, 2 sc in last ch. Join with sl st. (24 sc)
- Round 1: Ch 1, [1 sc in next 9 stitches, 2 sc in next stitch, 1 sc, 2 sc in next stitch] twice. Join. (28 sc)
- Straight Rounds: Ch 1, 1 sc in each stitch for 10 rounds, join with sl st. (28 sc per round)
- Tabby Stripes: With brown yarn, embroider 3-4 horizontal lines (4-6 stitches long) across body (rounds 30, 34, 38), using backstitch.
- Stuff: Fill body firmly to ¾ full.
Legs (Make 4)
- Start: With golden-brown yarn, magic circle, ch 1, 6 sc, pull tight. (6 sc)
- Increase Round 1: 2 sc in each stitch. (12 sc)
- Straight Rounds: 1 sc in each stitch for 6 rounds. (12 sc per round)
- Stuff: Fill leg halfway.
- Paw Base: Switch to brown yarn, [1 sc, 2 sc in next stitch] 6 times. (18 sc)
- Paw Round 2: 1 sc in each stitch. (18 sc)
- Close: [Sc2tog] 9 times (9 sc), fasten off with 8” tail, weave through stitches, pull tight.
- Attach: Sew front legs at rounds 35-37 (5 stitches apart), back legs at 39-41 (6 stitches apart). Position for standing, slightly forward-leaning.
Tail
- Start: With golden-brown yarn, magic circle, ch 1, 6 sc, pull tight. (6 sc)
- Increase: [1 sc, 2 sc in next stitch] 3 times. (9 sc)
- Straight Rounds: 1 sc in each stitch for 8 rounds. (9 sc per round)
- Stripes: With brown yarn, embroider 2-3 short lines (2-3 stitches) at rounds 47, 50.
- Stuff: Insert 5” pipe cleaner, add light filling.
- Taper: [1 sc, sc2tog] 3 times (6 sc), fasten off, weave tail through to close.
- Attach: Sew to back center at round 41, curling slightly upward.
Beekeeper Hat
- Base: With white yarn, magic circle, ch 1, 6 sc, pull tight. (6 sc)
- Increase Round 1: 2 sc in each stitch. (12 sc)
- Increase Round 2: [1 sc, 2 sc in next stitch] 6 times. (18 sc)
- Increase Round 3: [1 sc in next 2 stitches, 2 sc in next stitch] 6 times. (24 sc)
- Straight Rounds: 1 sc in each stitch for 4 rounds. (24 sc per round)
- Brim: [1 sc, 2 sc in next stitch] 12 times. (36 sc) Fasten off.
- Net: With white yarn, ch 20, sl st to join. [Ch 3, skip 1, sc in next stitch] around for 2 rows. Sew to brim edge.
- Attach: Sew hat to head between rounds 4-6, centered.
Apron
- Base: With yellow yarn, ch 16. Sc in 2nd ch from hook, sc across. (15 sc)
- Rows 2-3: Ch 1, turn, sc across. (15 sc per row)
- Stripes: With black yarn, embroider 2 horizontal lines (15 stitches long) across rows 1 and 3 using backstitch.
- Rows 4-8: With yellow yarn, ch 1, turn, sc across. (15 sc per row)
- Ties: Attach yellow yarn at top corners, ch 12, fasten off. Repeat on other side.
- Attach: Tie around body at round 36, knot at back.
Honeycomb
- Base: With tan yarn, ch 6. Sc in 2nd ch from hook, sc across. (5 sc)
- Rows 2-5: Ch 1, turn, sc across. (5 sc per row) Fasten off, leave tail.
- Attach: Sew to left front paw, angled as if held.
Bees (Make 3)
- Body: With yellow yarn, magic circle, ch 1, 6 sc, pull tight. (6 sc) Work 2 rounds of 6 sc.
- Stripes: With black yarn, embroider 2 short lines (2 stitches) around rounds 1 and 2.
- Wings: With white yarn, [ch 3, 2 dc, ch 3, sl st] twice into one stitch on top. Fasten off, stuff lightly, sew closed.
- Attach: Sew one bee to hat brim, one near honeycomb, one floating above right shoulder.
Whiskers
- Prepare: Cut 6 white floss strands, 6” each.
- Attach: Thread 3 per side through round 11 (1 stitch below eyes, 2 stitches apart). Knot inside, trim to 2”.
Assembly
- Head to Body: Sew head to body at round 35, straight—use ladder stitch.
- Pose: Stand upright with a forward lean, adjust legs and tail. Secure hat, apron, and bees.
Seasonal Touch
Your Beekeeper Cat is buzzing with springtime charm! With his tiny bees and honeycomb, he’s a cute guardian of the pollinating season. Set him near a flowerpot, and let him hum through April and May.

