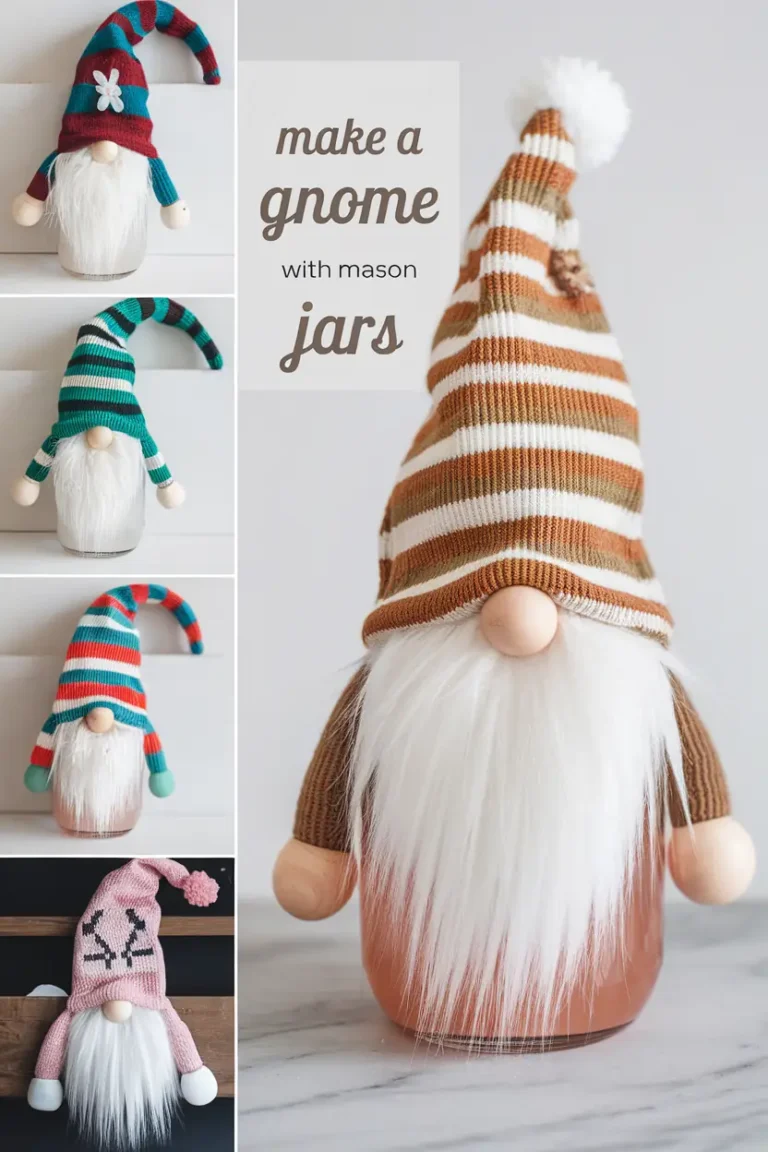
Want a DIY that’s perfect for decorating or even selling at holiday markets?
These Gnome Mason Jar Crafts are an absolute crowd-pleaser! These Gnome Mason Jar Crafts are cute and adorable adding charm to your home without much fuss.
With their cozy, festive look, they make perfect decorations or holiday gifts. Plus, they’re surprisingly easy to make, even if you’re new to crafting.
Why You’ll Love This Article:
- Easy to Make and Sell: Great for holiday markets or Etsy.
- Low-Cost Materials: Create cute crafts without breaking the bank.
- Holiday Charm: Adds a festive touch to any room.
- Beginner-Friendly: Simple steps anyone can follow.
Materials Needed for Gnome Mason Jars
- Mason Jar: Any size works, but a standard quart jar is ideal for this project.
- Fabric or Sock for the Hat: Use a striped sock or felt in cozy colors to make the gnome’s hat.
- Faux Fur Fabric: For the beard, you’ll need a small piece of faux fur.
- Wooden Bead or Pom-Pom: This will serve as the gnome’s nose.
- Hot Glue Gun: For attaching the parts securely.
- Scissors: To cut the fabric and fur.
- Optional Decorations:
- Glitter: Sprinkle a little on the hat for festive sparkle.
- Fairy Lights: Place small, battery-operated lights inside the jar for a warm glow.
- Pom-Pom: Attach to the end of the hat for a cute finishing touch.
Step-by-Step Guide to Making a Gnome Mason Jar
Step 1: Prepare the Mason Jar
- Start with a clean, dry mason jar. Remove any labels or stickers.
- If desired, fill the jar with fairy lights or small treats if you’re using it as a gift.
Step 2: Cut the Beard
- Measure the width of the jar to determine how wide the beard should be.
- Cut a piece of faux fur fabric into a rectangle or trapezoid shape, wide enough to cover the front of the jar.
- Make sure the fur’s “grain” is pointing downwards to mimic a beard.
Step 3: Attach the Beard
- Use a hot glue gun to attach the top of the beard to the jar, positioning it about halfway down the jar.
- Press down gently and let the glue set for a few seconds to ensure it’s securely attached.
Step 4: Create the Hat
- If using a sock, cut off the bottom part, leaving only the cuff area as the hat. You can roll up the edge slightly for a cozy look.
- If using felt or fabric, cut a triangle that’s wide enough to wrap around the top of the jar. Glue the edges to form a cone shape.
- Slip the hat or sock over the lid area of the jar, adjusting it so it sits comfortably over the beard.
Step 5: Add the Nose
- Place a wooden bead or pom-pom at the center, just above the beard. Use hot glue to secure it, positioning it right where the hat meets the beard.
- Make sure it’s firmly attached so it won’t move around.
Step 6: Secure the Hat
- Glue down the back of the hat to keep it in place on the jar.
- For extra charm, you can bend the top of the hat slightly to one side and secure it with a dab of glue.
- Add a small pom-pom or tiny decoration to the tip of the hat, if desired.
Step 7: Optional Add the hands
- To make the gnome’s hands, cut two small rectangles from the same sock or fabric as the hat.
- Place a cotton ball or small amount of fabric scrap in the center, fold the fabric around it, and glue the ends closed to create a rounded shape.
- Then, glue each “hand” to the sides of the mason jar, just below the hat, so they sit next to the beard.
Step 8: Final Touches
- Optional: Add a bit of glitter to the hat or a dusting of fake snow for a wintery look.
- If you’ve placed lights inside the jar, turn them on to see the warm glow shining through.
Tips for Working with Materials
- Hot Glue: Be cautious when gluing the faux fur and fabric, as the hot glue can seep through. Use a small amount and press carefully.
- Faux Fur: When cutting the faux fur, cut from the back to avoid cutting through the fur strands. This keeps the beard looking natural and fluffy.
- Sock or Fabric Choice: Choose stretchy fabric if possible, as it makes it easier to shape the hat around the jar.
Time Required to Make This Craft
This Gnome Mason Jar craft typically takes about 30–45 minutes to complete, depending on your crafting speed and experience. Here’s a breakdown of the time for each step:
- Preparing Materials: 5 minutes
- Cutting and Gluing the Beard: 5–10 minutes
- Making and Attaching the Hat: 10 minutes
- Adding the Nose and Final Touches: 5–10 minutes
If you’re adding extra details, such as lights or glitter, or working carefully to get the best look, it may take a bit longer. However, this is a quick and satisfying craft project that you can easily complete in under an hour.
Clarifications and Tips for Making the Gnome Mason Jar
- Choosing the Right Sock or Fabric for the Hat
- Pick a sock with a bit of stretch, as it makes it easier to slide over the jar lid and adjust. Striped or patterned socks work great for adding character. If using felt or other fabric, try to use one that’s slightly flexible or soft to get a snug fit around the jar.
- Attaching the Beard Securely
- When gluing the beard, make sure you apply a thin, even layer of glue at the top edge of the faux fur piece. This helps it stick firmly without creating a bulky or uneven look. Be careful with the hot glue, as it can seep through the fabric of the beard backing. A quick press and hold for a few seconds is all you need to secure it well.
- Cutting the Faux Fur
- To get a fluffy, natural-looking beard, cut the faux fur from the back (fabric side), using small snips along the backing. This prevents you from cutting through the fur fibers themselves, keeping the beard’s texture full and natural-looking.
- Adjusting the Hat for a Better Fit
- If the hat or sock is too loose, use a small dab of glue to secure it to the jar’s rim or lid. Position it so it rests just above the beard, covering the glued part of the fur. You can add a bit of glue to the back of the hat as well to hold it in place.
- Adding the Nose
- Place the wooden bead or pom-pom directly under the edge of the hat and above the beard. A small dot of glue is enough to hold it securely. This placement makes the nose look as though it’s peeking out from under the hat, giving it that classic gnome look.
- Optional Decorations
- If you want to add a festive touch, sprinkle some glitter or glue a small accessory (like a mini bell or pom-pom) to the tip of the hat. Just make sure not to overdo it—sometimes, a simple look is best for these cute gnomes.
- Working with Lights (Optional)
- If you’re using fairy lights inside the jar, opt for battery-operated ones that fit snugly in the jar. Wrap the lights neatly inside before placing the hat on top. The lights add a lovely glow, especially if you’re displaying the gnome in a dimly lit space.
Extra Tips for a Polished Finish
- Trim the Beard if Needed: After attaching the beard, you might find it’s a bit too long. Feel free to give it a little trim to suit your taste. Just use sharp scissors to shape it without pulling on the fur.
- Experiment with Hat Positions: You can tilt the hat to one side or bend the top slightly and secure it with a dab of glue for extra character. This playful adjustment makes each gnome look unique.
- Use a Soft Brush to Remove Extra Glue: After gluing, you might notice some stray glue strands. Use a soft brush or your fingers to gently brush them away for a clean, finished look.
Mistakes to Avoid While Making Your Gnome Mason Jar
- Using Too Much Hot Glue
- Applying too much glue can make the fabric, beard, or decorations look bulky and messy. A small dot or thin line of glue is usually enough to hold each piece in place securely. Remember, less is more with hot glue!
- Cutting the Faux Fur Incorrectly
- If you cut the fur from the front side, you may end up with a blunt, uneven edge. Always cut from the back of the faux fur fabric, following the fabric base closely. This keeps the beard fluffy and natural-looking.
- Not Securing the Hat Properly
- If the hat or sock is loose, it might slip off or look uneven. Make sure to glue the back of the hat to the jar and, if needed, secure it at the rim. This helps keep the hat in place and gives the gnome a more polished look.
- Placing the Nose Too Low or Too High
- The nose should be positioned just under the hat’s edge, slightly overlapping with the beard. If placed too high, it may look awkward. If it’s too low, it won’t give that cozy, tucked-in look. Test the placement before gluing to get the perfect spot.
- Using Poor-Quality Materials
- Avoid using thin or low-quality fabric that doesn’t hold its shape well. Stretchy socks or thicker felt work best for the hat. For the beard, opt for faux fur with a natural flow instead of cheaper, flat fabrics for a softer look.
Many Ways to Modify This Craft
Seasonal Gnome Variations
-
- Change the hat color or add themed decorations for different seasons. Try using pastels and flowers for a spring gnome, or red and green with snowflake decorations for a Christmas gnome.
- You could also add a small jack-o’-lantern to the hat for a Halloween-themed gnome!
Add Fairy Lights Inside the Jar
-
- For an extra cozy touch, place battery-operated fairy lights inside the jar to give your gnome a warm glow.
- This is especially charming for holiday decor and makes your gnome double as a nightlight.
Try Different Hat Materials
-
- Instead of a sock, use felt, flannel, or even a small knitted hat for a unique look.
- Experiment with patterns like plaid for a rustic vibe, or use glitter fabric for a festive twist.
Paint the Mason Jar for Extra Color
-
- Paint the jar itself to add more character to your gnome. You could use a frosty white for a snowy effect, or even paint it green to look like a garden gnome.
- For a more permanent finish, use glass paint or spray paint.
Use a Larger or Smaller Mason Jar
-
- Try different jar sizes to create a family of gnomes in varying heights.
- A large mason jar can be the “parent” gnome, with smaller jars as “kid” gnomes. This also adds visual interest if you’re displaying several together.
Add a Pom-Pom or Tassel to the Hat
-
- Give the hat a playful touch by adding a pom-pom, bell, or tassel to the tip.
- It’s an easy addition that adds charm and makes your gnome even cuter.
Create Themed Gnomes for Holidays or Special Occasions
-
- Customize your gnome for specific holidays. For example:
- Valentine’s Day: Use pink and red fabric, add heart stickers, and maybe a tiny “Love” sign.
- Halloween: Add mini bats, orange and black colors, and a tiny broomstick.
- Thanksgiving: Give your gnome a cozy brown and orange theme, and add tiny leaf decorations.
- Customize your gnome for specific holidays. For example:
Personalize It with Names or Messages
-
- Add a small tag or label on the jar with the gnome’s “name” or a seasonal message.
- This works especially well if you’re using the gnome as a gift or a table decoration for events.
Where to Use This Gnome Mason Jar Craft as Decor
These adorable gnome mason jars are versatile and can add a cozy touch to many areas of your home. Here are some ideas on where to display them:
On the Mantel
-
- Place your gnome mason jars on the fireplace mantel along with other seasonal decorations.
- They add charm to any holiday setup and can be switched out with each season.
Holiday Tablescapes
-
- Use gnome mason jars as part of your dining table decor for Thanksgiving, Christmas, or other festive gatherings.
- They can serve as cute centerpieces or be placed alongside other holiday items.
Entryway Decorations
-
- Set up a few gnome jars in your entryway to welcome guests with a touch of holiday cheer.
- Arrange them with seasonal items like pumpkins in the fall or pinecones and greenery for winter.
Kitchen Decor
-
- Place a gnome mason jar in your kitchen as a fun accent on your counter or windowsill.
- They look especially festive if you fill them with holiday treats, like candy canes for Christmas or mini pumpkins for fall.
Bookshelves or Side Tables
-
- Gnome mason jars make charming accents for shelves and tables.
- Add one to a bookshelf or place it on a side table along with a candle or small plant to create a cozy, layered look.
Kids’ Rooms
-
- These gnomes are perfect for adding a playful touch to kids’ rooms.
- Place a few on a shelf or dresser, and maybe even create gnomes in colors or themes they love.
Porch or Patio Decor
-
- If you make weatherproof versions, gnome mason jars can brighten up your porch or patio for seasonal decor.
- Place them by the front door or on outdoor tables to add a welcoming, whimsical feel.
Gift Decor
-
- Use these gnomes as unique gift toppers!
- Attach one to a gift basket or package, and they’ll serve as both decor and an extra gift.
Pro Tips for Making the Perfect Gnome Mason Jar
Choose a Good Quality Sock or Fabric for the Hat
-
- Thicker, stretchy fabric works best for the hat, as it’s easier to shape and won’t slide off the jar.
- A high-quality sock will give a polished look and allow the hat to hold its shape well.
Keep Your Glue Neat and Precise
-
- Hot glue can get messy, so apply it sparingly. Use just enough to secure each piece, and avoid over-gluing, as excess glue can look bulky and unpolished.
- A thin layer of glue along the edges is usually enough to hold everything in place.
Trim the Faux Fur for a Natural-Looking Beard
-
- After attaching the beard, you may want to trim it slightly to make it look neat and even.
- Cut carefully to avoid chopping too much, and follow the natural direction of the fur for a soft, fluffy look.
Position the Nose Just Right
-
- For the best effect, place the nose so it’s nestled right under the edge of the hat and slightly overlapping the beard.
- This placement makes the gnome look cozy and tucked-in, which is key to that classic gnome look.
Experiment with Different Jar Sizes and Shapes
-
- Try using various sizes of mason jars, like pint-sized or half-gallon jars, to create a family of gnomes in different sizes.
- Smaller jars are great for gifts, while larger ones can serve as statement decor.
Add Decorative Details to the Hat
-
- Customize each gnome by adding small embellishments like a pom-pom on the hat’s tip, a sprig of greenery, or even mini ornaments for a festive look.
- These small details make your gnome extra special.
Use Battery-Powered Fairy Lights for a Magical Glow
-
- To make your gnome jar stand out, consider adding tiny battery-operated fairy lights inside the jar.
- The glow gives it a cozy, magical feel and is especially charming for evening decor.
Secure the Hat for Stability
-
- If the hat tends to slip, use a few small dabs of glue around the rim or at the back of the hat to keep it in place.
- This prevents the hat from sliding and ensures your gnome looks neat.
Mix and Match Colors and Patterns
-
- Get creative with the hat and beard colors! Try festive patterns like plaid, snowflakes, or polka dots.
- Mixing and matching patterns and colors gives each gnome a unique personality and adds variety to your display.
Consider Adding Weight to the Bottom
-
- If your gnome jar will be in a high-traffic area or outdoors, consider adding a bit of sand or small pebbles inside the jar to weigh it down.
- This helps keep it stable and less likely to tip over.
Common FAQs About Gnome Mason Jar Crafts
- What kind of jar should I use for this craft?
- Any mason jar will work, but quart-sized jars are a popular choice. You can also use smaller jars if you want a “mini gnome” or larger ones for more impact.
- Do I need to use hot glue, or can I use another type of glue?
- Hot glue is recommended because it holds fabric and faux fur securely on glass. If crafting with kids, a strong craft glue can work, but it may take longer to dry.
- What if I don’t have faux fur for the beard?
- You can substitute with other materials like yarn, cotton batting, or even shredded fabric strips to create a textured beard.
- Can I use something other than a sock for the hat?
- Absolutely! Felt, fleece, or any stretchy fabric works well. You can also sew a little hat from fabric scraps for a unique look.
- How can I make this gnome weatherproof for outdoor use?
- For outdoor use, consider using waterproof glue and sealing the fabric with a clear acrylic spray to protect it from moisture.
- Can I make these gnomes as gifts?
- Definitely! These gnome mason jars make wonderful, personalized gifts. You can even fill the jar with small treats, candles, or a string of lights for extra charm.
Conclusion: Share Your Festive Gnome Creations!
Creating these gnome mason jars is a fun, easy way to bring holiday cheer into your home or make heartfelt, handmade gifts for loved ones.
From customizing the hats to adding little details, each gnome will have its own personality and charm. Don’t be afraid to experiment with colors, decorations, and themes to make each one unique!
We’d love to see what you come up with!
Feel free to share your creations with friends and family, or post them on social media to spread some festive inspiration. I
f you enjoyed this guide, don’t forget to save it or share it for future DIY crafting ideas.
Happy crafting, and may your gnome jars bring warmth and joy to your holiday season!

