Meet the Gardening Cat
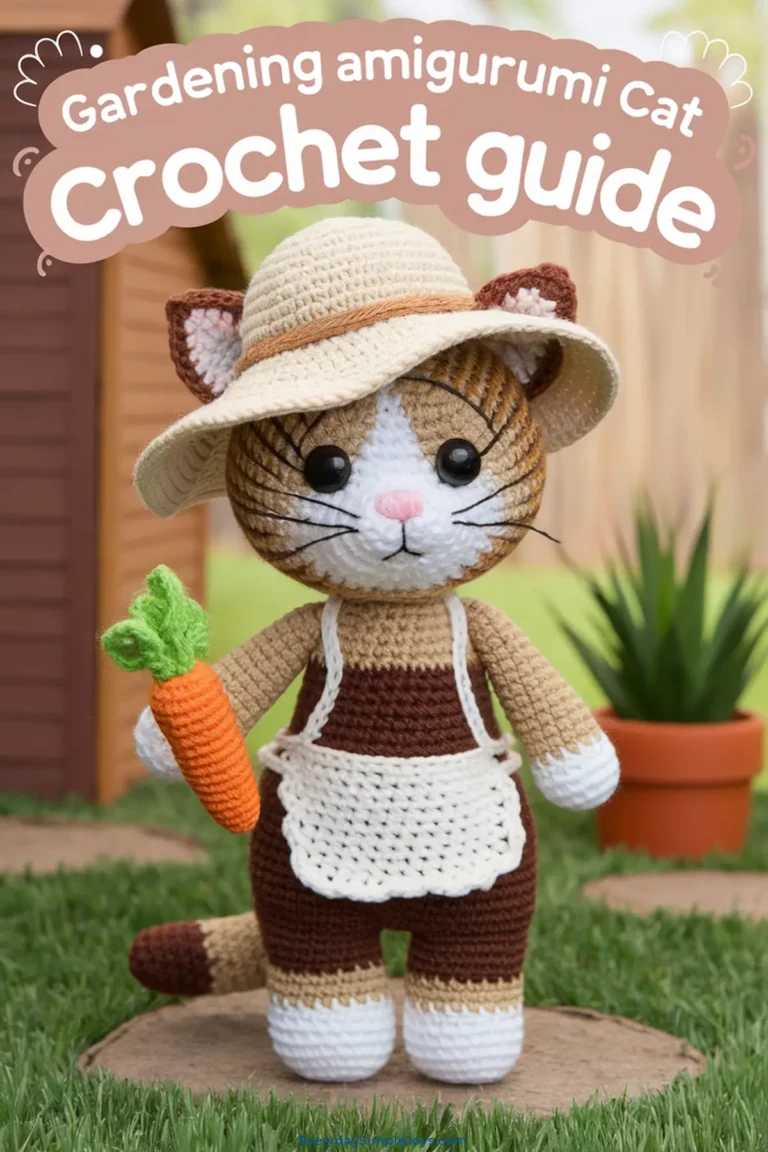
Introducing the Gardening Cat, a tough little guy who’s all about getting his paws dirty. This male kitty is a green-thumbed pro, sporting a sunhat, apron with veggie-stuffed pockets, and a tiny shovel by his side. With his earthy brown coat, practical stance, and no-nonsense stare, he’s here to supervise your spring planting. Or at least look like he is.
Personality
This cat’s a practical soul with a heart of soil. He’s the type to guard seedlings from pesky birds, nap in the shade of a tomato plant, and give you a stern look if your watering is off. Stitch him up, and he’ll bring a rugged charm to your craft corner, ready to dig into the season.
What You’ll Make
A 12-inch-long amigurumi cat standing upright (or slightly crouched), with a brown body, green apron, straw-yellow sunhat, and a small gray shovel. He’s got perky ears, four legs with tan paws, a short tail, and an embroidered face (eyes, nose, mouth, whiskers). Calico patches are swapped for dirt smudges, tying him to the garden theme.
Stitch Legend
- ch: Chain – Yarn over, pull through loop on hook.
- sc: Single Crochet – Insert hook into stitch, yarn over, pull up a loop, yarn over, pull through both loops.
- dc: Double Crochet – Yarn over, insert hook into stitch, yarn over, pull up a loop, yarn over, pull through 2 loops, yarn over, pull through remaining 2 loops.
- hdc: Half Double Crochet – Yarn over, insert hook into stitch, yarn over, pull up a loop, yarn over, pull through all 3 loops.
- sl st: Slip Stitch – Insert hook into stitch, yarn over, pull through stitch and loop on hook.
- sc2tog: Single Crochet Two Together (decrease) – Insert hook into next stitch, yarn over, pull up a loop, insert hook into next stitch, yarn over, pull up a loop, yarn over, pull through all 3 loops.
- Magic Circle: Adjustable loop—wrap yarn around finger, insert hook, yarn over, pull up a loop, work stitches into ring, pull tail to close.
Materials
- Yarn: Medium weight (4):
- Main body: Brown (e.g., Red Heart Super Saver “Coffee”), ~200 yards.
- Paws: Tan (e.g., Red Heart Super Saver “Buff”), ~50 yards.
- Apron: Green (e.g., Lion Brand Vanna’s Choice “Kelly Green”), ~75 yards.
- Sunhat: Straw-yellow (e.g., Bernat Handicrafter Cotton “Banana Yellow”), ~50 yards.
- Shovel: Gray (e.g., Red Heart Super Saver “Grey Heather”), ~10 yards.
- Face: Black yarn/thread (e.g., DMC Cotton Perle #5) for eyes/mouth, tan for nose.
- Dirt smudges: Dark brown (e.g., Red Heart Super Saver “Chocolate”), ~20 yards.
- Hook: Size H (5.0 mm) for a sturdy feel.
- Filling:
- Primary: Polyester fiberfill (~8-12 oz bag).
- Substitutes:
- Cotton batting: Soft, natural, denser.
- Yarn scraps: Finely chopped—eco-friendly.
- Wool roving: Light, fluffy, premium.
- Fabric strips: Washed, shredded clothing—sustainable, heavier.
- Extras:
- Optional: Safety eyes (10-12 mm)—for non-child use only.
- Yarn needle, scissors, stitch markers.
- Pipe cleaner (~4” for tail).
- Black embroidery floss or thin yarn (whiskers).
Gauge
16 sc x 18 rows = 4” square. Tight stitches hide filling.
Finished Size
~12” long (head to tail), 5” wide (with legs), 6” tall standing.
Notes
- Work in continuous rounds unless specified; mark first stitch.
- Stuff firmly for a sturdy stance—less floppy than Blossom Cat.
- US crochet terms used.
Step-by-Step Instructions
Head
- Magic Circle: With brown yarn, form a magic circle. Ch 1, 6 sc into circle, pull tight. (6 sc)
- Increase Round 1: 2 sc in each stitch. (12 sc)
- Increase Round 2: [1 sc, 2 sc in next stitch] 6 times. (18 sc)
- Increase Round 3: [1 sc in next 2 stitches, 2 sc in next stitch] 6 times. (24 sc)
- Increase Round 4: [1 sc in next 3 stitches, 2 sc in next stitch] 6 times. (30 sc)
- Increase Round 5: [1 sc in next 4 stitches, 2 sc in next stitch] 6 times. (36 sc)
- Straight Rounds: 1 sc in each stitch for 6 rounds. (36 sc per round)
- Decrease Round 1: [1 sc in next 4 stitches, sc2tog] 6 times. (30 sc)
- Decrease Round 2: [1 sc in next 3 stitches, sc2tog] 6 times. (24 sc)
- Begin Stuffing: Add filling halfway—push into edges.
- Decrease Round 3: [1 sc in next 2 stitches, sc2tog] 6 times. (18 sc)
- Decrease Round 4: [1 sc in next stitch, sc2tog] 6 times. (12 sc)
- Finish Stuffing: Fill firmly. Fasten off with 12” tail, weave through front loops, pull tight, knot, hide end.
Eyes (Choose One Method)
- Placement Note: Add eyes after head is stuffed. Position between rounds 9 and 10, 6 stitches apart (left edge to left edge). Mark if needed.
- Option 1: Yarn Eyes (Safe & Simple):
- Thread needle with black yarn (~12” length).
- Left eye: At round 9, 6 stitches left of center, make a French knot (wrap yarn 3 times around needle, pull through, anchor with a stitch).
- Right eye: Repeat at round 10, 6 stitches right of center.
- Knot inside head, weave in. Result: Small, round eyes, ~¼” wide.
- Option 2: Thread Eyes (Detailed):
- Use black floss (2 strands, ~18” length) and needle.
- Left eye: At round 9, 6 stitches left, outline a ½” oval (2-3 backstitches, up 2 rows, across 2 stitches), fill with 8-10 satin stitches.
- Right eye: Repeat at round 10, 6 stitches right.
- Add white floss dot in top left corner of each for sparkle. Knot inside. Result: Oval, expressive eyes.
- Option 3: Safety Eyes (Optional):
- Before stuffing (after step 7), insert 10-12 mm safety eyes at rounds 9-10, 6 stitches apart. Secure backs inside.
- Proceed with stuffing. Note: Not safe for kids under 3.
Nose
- Embroider: With tan yarn/thread, stitch a triangle at round 12, center. Base is 3 stitches wide, taper up 2 rows (4-5 satin stitches). Knot inside.
Mouth
- Embroider: With black yarn/thread, sew a straight line (2 stitches wide) at round 13, below nose. Add a short downward stitch at center for a stern look. Knot inside.
Ears (Make 2)
- Base: With brown yarn, ch 5. Sc in 2nd ch from hook, sc in next 3 ch. (4 sc)
- Row 2: Ch 1, turn, sc across. (4 sc)
- Row 3: Ch 1, turn, sc2tog, sc in next 2 stitches. (3 sc)
- Row 4: Ch 1, turn, sc2tog, sc in next stitch. (2 sc)
- Row 5: Ch 1, turn, sc2tog. (1 sc) Fasten off, leave 6” tail.
- Attach: Sew ears to head between rounds 3-6, 4 stitches apart, whipstitch base, angle outward.
Body
- Base Oval: With brown yarn, ch 12. Sc in 2nd ch from hook, sc in next 9 ch, 3 sc in last ch. Work opposite side: sc in next 9 ch, 2 sc in last ch. Join with sl st. (24 sc)
- Round 1: Ch 1, [1 sc in next 9 stitches, 2 sc in next stitch, 1 sc, 2 sc in next stitch] twice. Join. (28 sc)
- Straight Rounds: Ch 1, 1 sc in each stitch for 10 rounds, join with sl st. (28 sc per round)
- Stuff: Fill body firmly to ¾ full.
Legs (Make 4)
- Start: With brown yarn, magic circle, ch 1, 6 sc, pull tight. (6 sc)
- Increase Round 1: 2 sc in each stitch. (12 sc)
- Straight Rounds: 1 sc in each stitch for 6 rounds. (12 sc per round)
- Stuff: Fill leg halfway.
- Paw Base: Switch to tan yarn, [1 sc, 2 sc in next stitch] 6 times. (18 sc)
- Paw Round 2: 1 sc in each stitch. (18 sc)
- Close: [Sc2tog] 9 times (9 sc), fasten off with 8” tail, weave through stitches, pull tight.
- Attach: Sew front legs at rounds 35-37 (5 stitches apart), back legs at 39-41 (6 stitches apart). Position for standing—back legs slightly bent.
Tail
- Start: With brown yarn, magic circle, ch 1, 6 sc, pull tight. (6 sc)
- Increase: [1 sc, 2 sc in next stitch] 3 times. (9 sc)
- Straight Rounds: 1 sc in each stitch for 6 rounds. (9 sc per round)
- Stuff: Insert 4” pipe cleaner, add light filling.
- Taper: [1 sc, sc2tog] 3 times (6 sc), fasten off, weave tail through to close.
- Attach: Sew to back center at round 41, pointing slightly up.
Dirt Smudges
- Smudge 1: With dark brown yarn, ch 5, sc in 2nd ch and across (4 sc). Fasten off, leave tail.
- Smudge 2: Magic circle, ch 1, 6 sc, pull tight. Fasten off.
- Sew: Whipstitch smudges to body—rectangle on chest (round 36), circle on left leg (round 38).
Sunhat
- Base: With straw-yellow yarn, magic circle, ch 1, 6 sc, pull tight. (6 sc)
- Increase Round 1: 2 sc in each stitch. (12 sc)
- Increase Round 2: [1 sc, 2 sc in next stitch] 6 times. (18 sc)
- Increase Round 3: [1 sc in next 2 stitches, 2 sc in next stitch] 6 times. (24 sc)
- Straight Rounds: 1 sc in each stitch for 2 rounds. (24 sc per round)
- Brim: [1 hdc, 2 hdc in next stitch] 12 times. (36 hdc) Fasten off, leave 10” tail.
- Attach: Sew to head between rounds 4-6, centered, brim slightly curved.
Apron
- Base: With green yarn, ch 16. Sc in 2nd ch from hook, sc across. (15 sc)
- Rows 2-8: Ch 1, turn, sc across. (15 sc per row)
- Pocket: Ch 8, sc in 2nd ch and across (7 sc). Work 4 rows of 7 sc. Sew to apron front, centered (rows 3-6).
- Ties: Attach green yarn at top corners, ch 10, fasten off. Repeat on other side.
- Attach: Tie around body at round 36, knot at back.
Shovel
- Blade: With gray yarn, ch 5. Sc in 2nd ch, sc in next 3 ch (4 sc). Work 3 rows of 4 sc. Fasten off.
- Handle: Ch 8, sc in 2nd ch and across (7 sc). Fasten off, sew to blade top.
- Attach: Sew to right front paw base, angled like he’s holding it.
Whiskers
- Prepare: Cut 6 black floss strands, 6” each.
- Attach: Thread 3 per side through round 11 (1 stitch below eyes, 2 stitches apart). Knot inside, trim to 2”.
Assembly
- Head to Body: Sew head to body at round 35, straight—use ladder stitch.
- Pose: Stand upright or crouch slightly, adjust legs and tail. Secure hat and apron.
Seasonal Touch
Your Gardening Cat is ready to dig in! With his stern face and rugged gear, he’s the perfect springtime overseer. Set him by a potted plant, and let him guard your green dreams.

